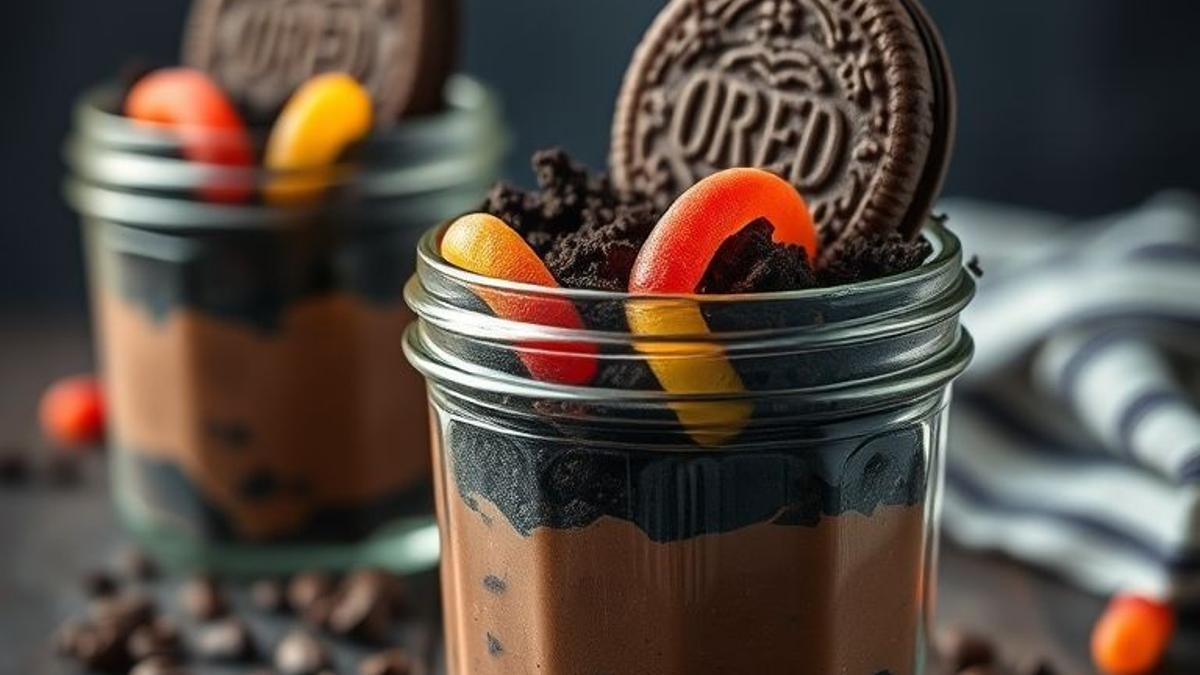
Hey there, fellow food lovers! It’s your favorite foodie from scooks.com, and with Halloween just around the corner, my kitchen has officially turned into a mad scientist’s lab of spooky, sweet creations. And let me tell you, I’ve got a real winner for you today! This is an irresistibly spooky and delicious treat that will be the absolute star of your Halloween party. Our Easy Halloween dirt cups recipe with Oreos and gummy worms isn’t just another dessert; it’s a super fun, no-bake activity that’s perfect for getting your own little monsters involved in the kitchen. We’ve tinkered and tweaked to perfect the layers, guaranteeing you get that ultimate creamy, crunchy, and chewy bite every single time. Seriously, what’s not to love?
Read Also: Easiest Pillsbury Halloween Cookies Upgrade (Ready in 15 Mins)
Why You’ll Love This Recipe
The Perfect Party Dessert
I just love a dessert that’s as easy to serve as it is to eat. These individually portioned cups are a dream for parties. There’s no slicing, no messy plates—just grab-and-go goodness. They’re a guaranteed hit with both the kids and the grown-ups who are still kids at heart.
Frightfully Fast & Easy
Ever find yourself needing a last-minute dessert that still looks impressive? This is it! With just a handful of simple ingredients and absolutely no oven required, you can whip up this spooky treat in under 20 minutes. It’s my go-to when I need something festive, fast!
Endlessly Customizable
Think of this recipe as your spooky canvas. It’s a fantastic base for all your ghoulishly creative additions. Want to get extra festive? Go for it! You can add candy tombstones, little marshmallow ghosts, or even some bone-shaped sprinkles. The possibilities are endless.
Make-Ahead Friendly
Let’s be real, party day is always a little chaotic. The best part about these dirt cups is that you can prepare them a day in advance, making your party planning a total breeze. Just cover and chill, and you’ve got one less thing to worry about!
Ingredient List
For the Chocolate Pudding Layer
- 1 package (5.9 oz) instant chocolate pudding mix: My little secret? Always grab the larger 5.9 oz box. It makes for the richest, most decadent pudding layer! A smaller 3.9 oz box will work in a pinch, but your cups will be a bit less full.
- 2 cups cold whole milk: Trust me on this one—whole milk creates the creamiest, most stable pudding that holds its shape beautifully. You can substitute with 2% milk, but I’d steer clear of skim milk as it might not set as firmly. For a dairy-free version, cold unsweetened almond or oat milk works great!
- 1 tub (8 oz) frozen whipped topping (like Cool Whip), thawed: This is what gives the pudding that light, fluffy, mousse-like texture. It’s absolutely divine. If you’re feeling ambitious, you can substitute with 1 ½ cups of your own homemade sweetened whipped cream.
For the “Dirt” and Gummy Worms
- 1 package (14.3 oz) Oreo cookies: You’ll want to use regular Oreos for this, and don’t you dare remove that cream filling—it’s part of the magic! If you’re a true chocoholic, the chocolate cream-filled Oreos will make it extra rich. Gluten-free chocolate sandwich cookies are also a fantastic substitute.
- 1 bag (5 oz) gummy worms: This is where the fun really begins! Feel free to add other spooky candies like candy pumpkins, bone-shaped sprinkles, or candy eyeballs for extra Halloween flair.
Step-by-Step Instructions
Step 1: Make the Oreo “Dirt”
- Go ahead and place the entire package of Oreo cookies (yep, filling and all!) into the bowl of a food processor.
- Pulse in short, 1-second bursts until the cookies look like coarse crumbs, almost like potting soil. You want a little texture here, so be careful not to over-process it into a fine powder.
- Don’t have a food processor? No problem at all! Just toss the cookies in a large, sealed zip-top bag and let out a little frustration by crushing them with a rolling pin or the bottom of a heavy pan. Works like a charm! Set the crumbs aside for now.
Step 2: Prepare the Creamy Pudding Filling
- In a large bowl, whisk together the instant chocolate pudding mix and the 2 cups of cold whole milk. Keep whisking for about 2 minutes, or until you feel it start to thicken up.
- Now, let the pudding stand for 5 minutes. This little rest is crucial for it to fully set.
- Gently fold the thawed whipped topping into your set pudding until it’s just combined. Try not to overmix—we want to keep all that light, airy goodness!
Step 3: Assemble Your Halloween Dirt Cups
- Set out 8-10 small, clear plastic cups or cute glass jars (about 7-9 oz each is perfect).
- Spoon about 1 tablespoon of those glorious Oreo crumbs into the bottom of each cup to create your first layer of dirt.
- Next, add a generous layer of the chocolate pudding mixture (about ¼ cup per serving).
- Sprinkle another tablespoon of Oreo crumbs right over that pudding layer.
- Top it off with a final, delicious layer of the chocolate pudding mixture.
- Finish with a generous sprinkle of the remaining Oreo “dirt” on top. This final layer makes it look so authentic!
Step 4: Decorate and Chill
- Now for the best part! Press a few gummy worms into the top of each dirt cup. Have some fun with it—make them look like they are crawling right out of the soil!
- Pop the dirt cups into the refrigerator for at least 1 hour before serving. This allows all those yummy flavors to meld together and the pudding to firm up completely.
Baker’s Tips for Success
Use Clear Cups
The magic of this dessert is totally in the layers! I highly recommend using clear plastic cups, small mason jars, or glass dessert bowls to really show them off. It’s a feast for the eyes!
Add a “Tombstone”
Want to take the graveyard theme to the next level? It’s so easy! Just grab a Milano cookie, write “RIP” on it with some black decorating gel, and stick it right into the top of the cup. It looks amazing.
Don’t Overmix the Pudding
I know it’s tempting to keep stirring, but when you’re folding in the whipped topping, mix only until you no longer see big streaks. Overmixing can deflate the topping and make your pudding layer runny, and nobody wants that.
Chill Completely
Please don’t skip the chilling step! It’s absolutely essential for the pudding to set properly. Plus, it gives the Oreo “dirt” time to soften just slightly, creating the most perfect texture imaginable.
Storage Instructions
If you happen to have any leftovers (which I doubt!), you can store your Halloween dirt cups covered tightly with plastic wrap in the refrigerator for up to 3 days. Just a heads-up, the Oreo cookie layers will get softer the longer they sit. For the best texture, I think they are best enjoyed within 24 hours of making them. We do not recommend freezing this dessert.
Frequently Asked Questions (FAQ) for Our Easy Halloween Dirt Cups Recipe with Oreos and Gummy Worms
Can I make this recipe dairy-free?
Absolutely! It’s super easy to adapt. Just use a dairy-free instant pudding mix, your favorite unsweetened plant-based milk (almond or oat milk work really well), and a dairy-free whipped topping, like one made from coconut or almonds.
Can I use homemade chocolate pudding?
Yes, you sure can! If you have a favorite homemade pudding recipe, go for it. Just make sure it’s completely cooled down in the refrigerator before you try to fold in the whipped topping and assemble the cups.
Can I make this as one large “dirt cake”?
Definitely! This recipe is fantastic as a single, large dessert. Simply layer all the ingredients in an 8×8 inch baking dish or a pretty glass trifle bowl for a show-stopping centerpiece. It’s perfect for a potluck!
How many servings does this make?
This recipe will make about 8-10 individual dirt cups. The final number really just depends on the size of the cups you’re using.
Enjoy Your Spooky Creation!
This Easy Halloween dirt cups recipe with Oreos and gummy worms is all about having a blast in the kitchen and creating a delicious memory with your favorite people. It’s more than just a dessert; it’s a spooky, fun, and tasty tradition. I truly hope you and your family love making (and, of course, eating) this festive treat as much as I do.
Happy Halloween!
I am a passionate recipe developer and food enthusiast specializing in heart-warming traditional dishes and simple, everyday meals. My goal is to inspire you to find joy and confidence in the kitchen through my easy-to-follow recipes.