Oh, summer! Can you feel that sunshine warming your face? For me, there’s nothing quite like a frosty, fruit-filled treat to beat the heat. But let’s be real, those store-bought popsicles? They often come packed with artificial colors and ingredients we can’t even pronounce. That’s where our foolproof guide to making delicious Homemade Popsicles For Kids comes in! I absolutely love whipping up these icy, refreshing delights because I know exactly what’s going into them – just pure, wholesome goodness. Get ready to ditch the mystery ingredients and embrace a fun, easy, and totally customizable experience that will make you the hero of hot days. You’re going to love how simple it is to create healthy treats that everyone, especially your little ones, will adore!
Why You’ll Love This Recipe
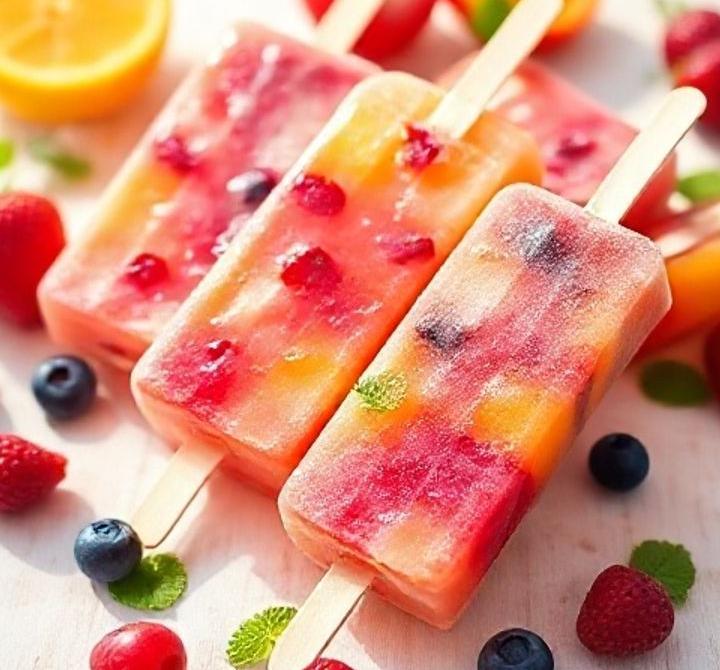
- Healthier & Wholesome: You’ll be in complete control of the sugar content, using only fresh, natural fruits. Say goodbye to artificial anything – it’s pure goodness!
- Budget-Friendly: Trust me, making these at home is significantly cheaper than constantly buying pre-made popsicles from the store. Your wallet will thank you!
- Kid-Approved Fun: This isn’t just a recipe; it’s a fantastic activity to do with your little ones. They’ll absolutely love helping you choose fruits, blend, and then, of course, devour their own creations.
- Endless Customization: The possibilities are truly limitless here! Ever wondered how many amazing flavor combinations you could create? Experiment with different fruits, juices, and fun add-ins.
- Perfect for Hot Days: When that summer sun is blazing, these Homemade Popsicles For Kids are the ultimate cooling refreshment that’s both satisfying and wonderfully hydrating.
- Dietary Friendly: It’s super easy to adapt this recipe for various dietary needs, whether you’re looking for sugar-free options, dairy-free alternatives, or anything in between.
Detailed Ingredient List
For a Classic Berry Burst Popsicle (Yields 6-8 popsicles, depending on mold size)
- Fruits:
- 1 ½ cups mixed berries (fresh or frozen – strawberries, blueberries, raspberries)
- Liquid:
- ½ cup 100% apple juice, white grape juice, or water
- Sweetener (Optional, adjust to taste):
- 1-2 tablespoons honey, maple syrup, or agave nectar
- Optional Add-ins:
- ½ cup plain Greek yogurt (for creamier pops)
- 1 teaspoon fresh lemon juice (brightens flavors)
Ingredient Notes & Substitutions
- Fruits:
- Substitution: Any ripe fruit works like a charm! Think juicy mango, sweet pineapple, ripe peaches, vibrant kiwi, tart cherries, or any delightful combination. For softer fruits like bananas, I usually suggest reducing the liquid just a tiny bit.
- Tip: Frozen fruit works wonderfully here and actually helps create a thicker, less icy base without needing any extra ice! It’s my go-to secret.
- Liquid:
- Substitution: Get creative! Coconut water is fantastic for electrolytes, or try orange juice, milk (dairy or non-dairy like almond or coconut milk for an extra creamy touch), or simply plain water for that pure fruit flavor.
- Sweetener:
- Substitution: Granulated sugar works too (just dissolve it in a little warm water first!), or stevia. And honestly, if your fruit is super sweet, you can often just omit the extra sweetener altogether.
- Tip: Always taste your mixture before freezing, because sweetness levels can really mute when things get cold. You’ll want it a little sweeter than you think!
- Optional Add-ins:
- For Creaminess: Full-fat coconut milk, a bit of ripe avocado for an unexpected creamy texture, or even a scoop of protein powder if you’re making these for an adult treat!
- For Texture: A sprinkle of chia seeds, finely chopped fresh mint, or tiny little fruit pieces can add such a lovely, unexpected bite.
Step-by-Step Instructions
- Prep Your Fruit: First things first, if you’re using fresh fruit, make sure to wash it thoroughly. If you’re going with frozen, letting it thaw slightly will make blending much easier, but honestly, using it straight from the freezer works great for a thicker mixture!
- Combine Ingredients: Grab your trusty blender! Toss in your mixed berries (or whatever delicious fruit you’ve chosen), your liquid, and any optional sweetener. If you’re adding yogurt or other fun add-ins, now’s the time to pop them in too.
- Blend Until Smooth: Hit that blend button and let it run on high until your mixture is completely smooth and luscious. If you’re like me and love a little texture, blend it a bit less to leave some small fruit pieces – it’s totally up to you! Don’t forget to taste and adjust the sweetness if you think it needs a little something extra.
- Pour into Molds: Carefully pour your vibrant fruit mixture into your popsicle molds. My secret tip here? Leave about ¼ inch of space from the top. This allows for a little expansion as it freezes and prevents messy overflows!
- Insert Sticks: Now, gently slide your popsicle sticks into the molds. If your molds come with those handy lids that have stick slots, go ahead and secure them.
- Freeze Solid: Transfer those filled molds to the freezer. This is the hardest part – the waiting game! Freeze them for at least 4-6 hours, or even better, just leave them overnight to ensure they’re completely solid. That’s how you get perfect Homemade Popsicles For Kids!
- Enjoy! The moment you’ve been waiting for! To remove your perfectly frozen treat, simply run the bottom of the mold under warm water for about 15-30 seconds. Then, give the stick a gentle pull. Voila!
Baker’s Tips / Pro Tips for Success
- Don’t Overfill: I can’t stress this enough! Always leave a little room (that ¼ inch I mentioned earlier) at the top of your molds. Liquids expand when they freeze, and you don’t want a sticky mess.
- Easy Release: If your popsicles are being stubborn, don’t force it! Just run the outside of the mold under warm (not hot!) water for a few seconds. Using hot water can melt the edges too quickly, and we want perfect pops.
- Layering Fun: Want to get fancy? For gorgeous, multi-colored popsicles, freeze each layer for about 30-60 minutes until it’s firm before carefully adding the next layer. It’s a little extra effort, but so worth it for the “wow” factor!
- Prevent Separation: If your mixture includes ingredients that tend to separate (like coconut milk), give it a really good stir just before you pour it into the molds. This keeps everything evenly distributed.
- Sneak in Veggies: This is one of my favorite tricks for Homemade Popsicles For Kids! Blend in a handful of spinach (trust me, the fruit completely masks the flavor!), some grated carrots, or even cooked sweet potato for an extra boost of nutrition. They’ll never know!
- No Molds? No Problem! Don’t let a lack of fancy molds stop you. Small paper cups and wooden sticks work absolutely perfectly. Once frozen, just tear away the cup, and you’ve got a fantastic homemade treat.
- Creamier Pops: For a delightfully less icy texture, my secret is to add full-fat yogurt, a dollop of coconut cream, or even a small amount of ripe avocado to your blend. It makes them so wonderfully smooth.
- Sweetness Matters: Remember that cold foods naturally taste less sweet than room-temperature foods. Don’t be afraid to make your mixture taste slightly sweeter than you think you need it to be before freezing.
Storage Instructions
Once your delicious popsicles are completely frozen, it’s best to remove them from their molds. To keep them fresh and prevent any dreaded freezer burn, store them individually wrapped in plastic wrap or tuck them into an airtight freezer bag or container in the freezer. They’ll happily last for up to 2-3 weeks, though I doubt they’ll stick around that long!
Frequently Asked Questions (FAQ)
- Q: Can I use fresh fruit instead of frozen?
- A: Absolutely! Fresh fruit works just as well and often gives a vibrant flavor. My only tip is that if your fresh fruit is particularly watery, you might want to reduce the added liquid a tiny bit to get that perfect consistency for your Homemade Popsicles For Kids.
- Q: My popsicles are too icy, what did I do wrong?
- A: Don’t worry, it happens! This usually means there’s a bit too much water and not enough natural sugar or fat in your mixture. To fix it next time, try adding more fruit puree, a little extra sweetener, or a creamy element like yogurt or coconut milk. That should give you a wonderfully smooth pop!
- Q: How long do homemade popsicles take to freeze?
- A: Generally, for smaller molds, you’re looking at about 4-6 hours. But honestly, I always recommend leaving them overnight. That way, you’re absolutely sure they’re completely solid and ready for prime time!
- Q: Can I make these sugar-free?
- A: Yes, you absolutely can! Focus on using naturally sweet fruits like ripe bananas or super ripe mangoes, and pair them with sugar-free juice or just plain water. You can also incorporate a sugar substitute that’s suitable for freezing if you prefer.
- Q: What if I don’t have a blender?
- A: No blender? No problem! For very soft fruits like berries or bananas, you can totally mash them thoroughly with a fork until they’re as smooth as possible, and then stir in your liquid. If you want an extra smooth consistency, you can even strain it through a fine-mesh sieve.
Conclusion
Making Homemade Popsicles For Kids is so much more than just following a recipe; it’s a wonderful opportunity for creativity, ensuring healthy eating, and making those precious, joyful summer memories. With endless flavor possibilities at your fingertips and the incredible satisfaction of knowing exactly what goes into each and every treat, I promise you’ll wonder why you ever bought them from the store again. So go ahead, grab your blender, gather your favorite fruits, and start freezing up some pure happiness today! And please, don’t be shy – share your delicious, colorful creations with us at scooks.com! I can’t wait to see what you whip up!
You Might Also Like…
Enjoyed making these refreshing treats? Here are more articles you might love:
* Healthy Snacks for Picky Eaters
* Best Homemade Eskimo Pie Popsicle Recipe
I am a passionate recipe developer and food enthusiast specializing in heart-warming traditional dishes and simple, everyday meals. My goal is to inspire you to find joy and confidence in the kitchen through my easy-to-follow recipes.