Hey everyone, and welcome to Scooks! I am so excited to share what I truly believe is the only belgian waffle recipe you’ll ever need. Seriously. It’s time to push that dusty box of mix to the back of the pantry for good. We’re talking about real-deal, from-scratch waffles with unbelievably golden, crispy exteriors. You know, the ones with those glorious deep pockets that are just begging to be filled with pools of melted butter and warm maple syrup. And the inside? Impossibly light, fluffy-as-a-cloud, and absolutely heavenly. This foolproof recipe breaks down all the simple secrets to achieving that authentic, bakery-quality texture right in your own kitchen. Ready to make some magic? Let’s get cooking!
Why You’ll Love This Recipe
The Perfect Texture
What makes this belgian waffle recipe stand out? It’s all about one simple but game-changing technique—whipped egg whites! Folding them into the batter creates a ton of air, which bakes up into an incredibly light, airy, and crisp waffle. There are absolutely no dense, cakey waffles here, I promise!
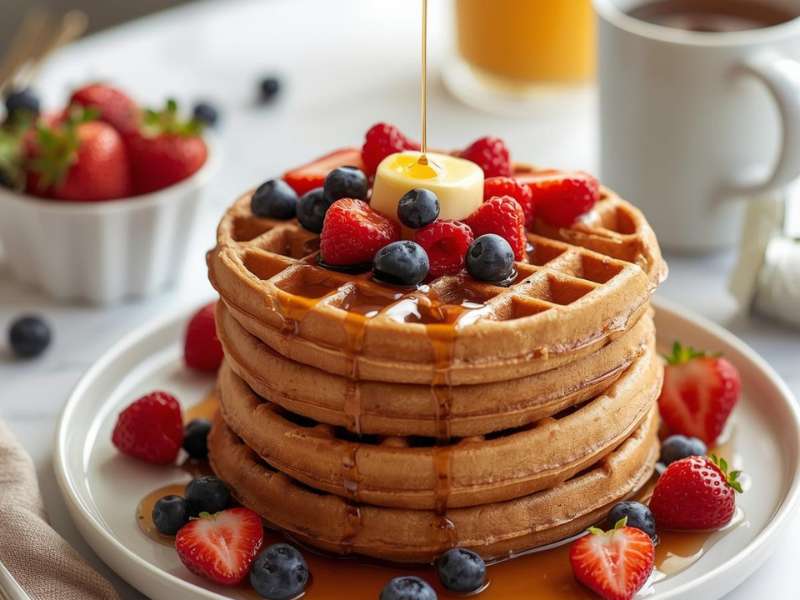
Deep Pockets for Toppings
I mean, isn’t this what it’s all about? True Belgian waffles are famous for those deep squares. They are the perfect little vessels for holding all your favorite toppings, from classic butter and syrup to fresh berries, a dollop of whipped cream, or even a scoop of ice cream. Go wild!
Surprisingly Simple
While they look and taste incredibly gourmet, you’ll be shocked to see these waffles are made with basic pantry staples you probably have on hand right now. I’ll walk you through each and every step to ensure you get perfect results, even if you’re a total beginner in the kitchen.
Freezer-Friendly for Busy Mornings
This is my favorite mom-hack! Make a double batch over the weekend and freeze the leftovers. You can have a warm, crispy waffle ready in just a few minutes on a busy weekday morning. It’s so much better (and cheaper!) than the store-bought kind.
Ingredient List
A complete, printable recipe card with measurements is available at the bottom of this post.
Waffle Batter Ingredients
- All-Purpose Flour: This provides the main structure for our waffles. My pro tip: Be sure to spoon the flour into your measuring cup and level it off with a knife. Don’t scoop directly from the bag, or you’ll pack it in and end up with dry waffles!
- Granulated Sugar: We just need a touch for flavor and to help the waffles get that beautiful golden-brown color.
- Baking Powder: This is the primary leavening agent that gives the waffles their initial awesome lift.
- Salt: A little bit of salt is crucial for balancing all the flavors.
- Large Eggs: You’ll need two, and you’ll need to separate them. The yolks add richness and flavor, and the whites are whipped to create that signature airy texture. This is our secret weapon!
- Whole Milk: Adds moisture and a lovely richness to the batter. Substitution: Buttermilk can be used for a delicious tangy flavor, or you can use a plant-based milk like unsweetened almond milk for a dairy-free option.
- Unsalted Butter: Melted, of course! This adds incredible flavor and is key to getting that crisp exterior. Substitution: A neutral oil like canola or melted coconut oil can be used in a pinch if you’re out of butter.
- Vanilla Extract: Don’t skip this! It adds that classic, warm bakery aroma and flavor we all love.
Step-by-Step Instructions
1. Prep and Mix Dry Ingredients
First things first, let’s get that Belgian waffle iron preheating according to the manufacturer’s instructions. In a large bowl, whisk together the all-purpose flour, sugar, baking powder, and salt. Giving it a good whisk now helps distribute everything evenly. Set that bowl aside.
2. Mix the Wet Ingredients
In a separate medium bowl, whisk together the egg yolks, milk, melted butter, and vanilla extract until it’s all smooth and well combined. Easy peasy.
3. Combine Wet and Dry
Now, pour the wet ingredient mixture into your bowl of dry ingredients. Gently whisk everything together until it’s just combined. And I mean it—do not overmix! A few small lumps in the batter are perfectly fine and actually a good thing.
4. Whip the Egg Whites
Here comes the magic! In a separate, squeaky clean, and completely dry bowl, use an electric hand mixer or a stand mixer with the whisk attachment to beat the egg whites on high speed. You’re looking for stiff peaks to form. What does that mean? When you lift the beaters out of the whites, the peak that forms holds its shape and doesn’t collapse back into the bowl.
5. Fold in the Egg Whites
Time to be gentle. Gently fold the whipped egg whites into the waffle batter using a rubber spatula. I like to do this in two or three additions to avoid deflating all that wonderful air you just created. The batter should look super light and airy. Let the finished batter rest for about 5 minutes.
6. Cook the Waffles
Your waffle iron should be nice and hot by now! Lightly grease it with a little nonstick spray or a brush of melted butter. Pour the recommended amount of batter onto the center of the iron (check your manual for this) and close the lid. Cook until the waffle is beautifully golden brown and crisp, and the “ready” indicator light comes on. This usually takes about 3-5 minutes. A great visual cue is that most waffle makers will stop steaming when the waffle is done.
7. Keep Warm and Serve
Carefully remove the perfect waffle and place it on a wire cooling rack. This is so important because it prevents it from getting soggy on the bottom. If you’re making a big batch for the family, you can keep the finished waffles warm by placing them in a single layer on a baking sheet in a 200°F (95°C) oven. Serve ’em up hot with your favorite toppings!
Baker’s Tips for Success
Don’t Overmix the Batter
I know I already said it, but it’s the most important rule of waffle-making! When you combine the wet and dry ingredients, mix only until you no longer see big streaks of dry flour. Overmixing develops the gluten in the flour, which will result in tough, chewy waffles instead of the light and tender ones we’re aiming for with this belgian waffle recipe.
The Egg White Fold is Key
Be gentle when you’re folding in your whipped egg whites! This step is what makes these Belgian waffles so incredibly airy and special. Use a light, scooping “under-and-over” motion with your spatula to incorporate them without losing all that precious volume you worked to create.
Keep Them Crispy!
Have you ever made a beautiful waffle only to have it go limp a minute later? The culprit is usually steam. Never stack hot waffles on top of each other on a plate! The trapped steam will make them soft and soggy in no time. The best way to hold them is in a single layer on a wire rack.
Know Your Waffle Iron
Every waffle maker cooks a little differently. Don’t be discouraged if the first one isn’t perfect—the first waffle is always the “test” waffle! Use it to gauge exactly how much batter you need and to figure out the perfect cooking time for your specific machine.
Storage Instructions
Refrigerator
Store completely cooled waffles in an airtight container or a zip-top bag in the refrigerator for up to 3 days.
Freezer (Recommended)
For longer storage, which is what I almost always do, allow the waffles to cool completely on a wire rack. Then, place them in a single layer on a baking sheet and pop them in the freezer until they’re solid, about 1-2 hours. Once they’re frozen, you can transfer them to a freezer-safe bag or container. They’ll keep beautifully for up to 3 months!
How to Reheat
For the best crispy texture, you’ll want to reheat waffles directly from the fridge or freezer. The best way is in a toaster or a toaster oven until they’re hot and re-crisped. An air fryer also works wonderfully for this! I really don’t recommend using a microwave, as it will just make them soft and steamy.
Frequently Asked Questions (FAQ)
What is the difference between a Belgian waffle and a regular waffle?
Great question! Belgian waffles are generally known for their extra-deep pockets (for more toppings!), larger size, and a much lighter, crispier texture. This amazing texture is typically achieved by using a special leavening agent like the whipped egg whites in this recipe, or sometimes yeast.
Why are my waffles not crispy?
This could be due to a few common culprits: your waffle iron wasn’t hot enough when you started, you might have accidentally stacked the hot waffles on a plate instead of a wire rack, or the batter was a little overmixed. Following all the tips in this belgian waffle recipe should guarantee you a perfectly crispy result!
Can I make the batter ahead of time?
Because this specific recipe relies so heavily on those freshly whipped egg whites for its light and airy texture, the batter is definitely best used immediately after it’s mixed. If you let it sit for too long, the egg whites will deflate, and you’ll end up with much denser waffles.
Enjoy Your Perfect Homemade Waffles!
And there you have it—a simple, totally reliable recipe for the most delicious Belgian waffles you’ll ever make at home. They’re perfect for a slow weekend morning, a special holiday breakfast, or even a fun “breakfast-for-dinner” night. We really hope you and your family love them as much as we do!
What are your absolute favorite waffle toppings? I’d love to hear! Let us know in the comments below!
I am a passionate recipe developer and food enthusiast specializing in heart-warming traditional dishes and simple, everyday meals. My goal is to inspire you to find joy and confidence in the kitchen through my easy-to-follow recipes.