Hey everyone, and welcome back to scooks.com! Let’s talk about pure, unadulterated comfort food. For me, nothing quite hits the spot like a warm, buttery, flaky biscuit straight from the oven. Is there anything better? That first bite, where it practically melts in your mouth, revealing all those incredible layers… it’s just magic. For years, I thought bakery-quality biscuits were out of reach for the home cook, but I’m here to tell you that’s just not true. I’ve tested and tweaked, and I am SO excited to share what I can confidently call the only easy biscuit recipe you will ever need. This is a foolproof guide to achieving those sky-high, melt-in-your-mouth biscuits with minimal effort. Seriously, get ready for your kitchen to smell like heaven!
Why You’ll Love This Easy Biscuit Recipe
I could go on and on, but if you’re not convinced yet, here’s exactly why this recipe will become your new go-to:
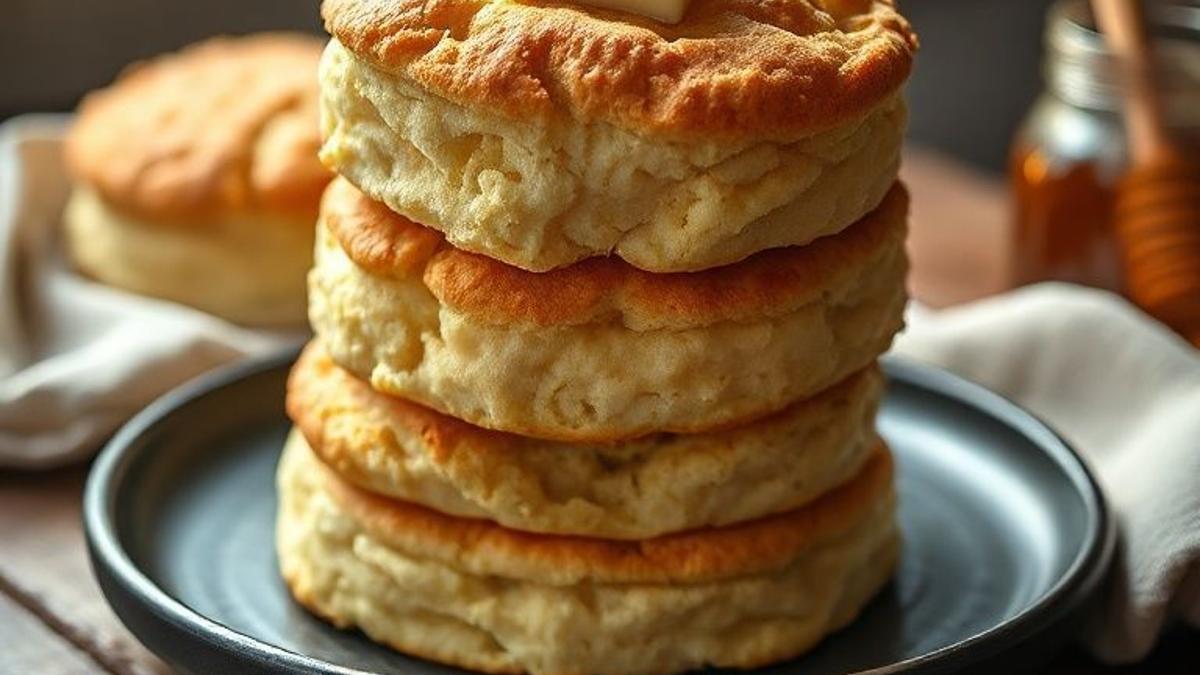
- Sky-High and Fluffy: Forget flat, sad biscuits! Our simple folding technique is the secret to creating incredible, visible layers that puff up beautifully in the oven.
- Rich Buttery Flavor: We’re using real, honest-to-goodness butter here. That rich, comforting flavor is non-negotiable for a truly perfect biscuit.
- Ready in Under 30 Minutes: This isn’t an all-day baking project. You can go from mixing bowl to a warm basket of biscuits on the table in less than 30 minutes flat. It’s a weeknight miracle!
- Simple, Pantry-Staple Ingredients: No fancy flours or special ingredients required. You probably have everything you need to make this easy biscuit recipe right now.
- Absolutely Foolproof: Are you a first-time baker? Don’t you worry! I’ve packed this post with all my best tips and tricks to guarantee your success. You’ve got this!
Ingredient List
For the Biscuits
- 2 cups All-Purpose Flour
- 1 tablespoon Baking Powder
- 1 tablespoon Granulated Sugar
- 1 teaspoon Fine Sea Salt
- ½ cup (1 stick) Very Cold Unsalted Butter, frozen
- ¾ cup Cold Buttermilk
For the Finishing Touch
- 2 tablespoons Unsalted Butter, melted
Ingredient Notes & Substitutions
- Flour: Don’t have all-purpose? You can use self-rising flour! If you do, omit the baking powder and reduce the salt to ½ teaspoon. It’s an easy swap.
- Butter: The number one rule of biscuit making is to keep your butter ice cold. My secret weapon is to pop the stick of butter in the freezer for about 15-20 minutes before I start. Then, I grate it directly into the flour using a box grater. This creates tiny butter pockets that release steam in the hot oven, which is what gives you those unbelievably flaky layers! If you only have salted butter, that’s fine—just reduce the added salt in the recipe to ½ teaspoon.
- Buttermilk: Buttermilk is the key to a tender, flavorful biscuit. Its acidity reacts with the baking powder for extra lift and also tenderizes the gluten, keeping the biscuits soft. Don’t have buttermilk? No problem! You can make a quick DIY version. Just add 1 tablespoon of lemon juice or white vinegar to a measuring cup, then fill it with regular milk to the ¾-cup line. Let it sit for 5-10 minutes to curdle slightly, and you’re good to go!
Step-by-Step Instructions
Ready to bake the best biscuits of your life? Let’s do this!
- Prep Oven and Pan: First things first, get your oven preheating to 425°F (220°C). Line a baking sheet with parchment paper so nothing sticks.
- Whisk the Dry Ingredients: In a large bowl, whisk together the all-purpose flour, baking powder, granulated sugar, and salt. Give it a good mix to make sure everything is evenly distributed.
- Cut in the Cold Butter: Grab your frozen stick of butter and a box grater. Grate the butter directly into the flour mixture. Use your fingertips or a pastry cutter to quickly toss it all together until the butter is coated and the mixture looks like coarse, sandy crumbs.
- Stir in the Buttermilk: Pour the cold buttermilk in all at once. Use a fork to mix just until a shaggy, clumpy dough starts to form. The key here is not to overmix! A slightly messy, lumpy dough is exactly what we’re aiming for.
- Create the Flaky Layers (The Lamination Fold): Lightly flour your work surface and turn the dough out. It’ll look a little rough, but trust the process. Gently pat the dough into a rough rectangle, about 1-inch thick. Now, fold one-third of the dough over the center, like you’re folding a letter. Then fold the other third over top of that. Rotate the dough 90 degrees and gently pat it out into a rectangle again. Repeat this folding and patting process two more times. This step is the secret sauce that makes this easy biscuit recipe so incredibly flaky!
- Cut the Biscuits: After the final fold, gently pat the dough out to about a ¾-inch thickness. Using a 2.5-inch round biscuit cutter, press straight down to cut out your biscuits. Do not, I repeat, do not twist the cutter! Twisting seals the edges and prevents the biscuits from rising tall.
- Bake: Arrange the biscuits on your prepared baking sheet so their sides are just barely touching. This helps them support each other and rise even higher. Brush the tops with a little melted butter. Bake for 12-15 minutes, or until they are gloriously tall and golden brown on top.
Baker’s Tips for Perfect Biscuits
Here are a few of my can’t-miss tips to ensure your biscuits are perfect every single time.
- Cold is Key: I know I’ve said it before, but it’s the most important rule! Your butter, buttermilk, and even your mixing bowl (if you think of it!) should be as cold as possible for the flakiest results.
- Don’t Overwork the Dough: Be gentle! The more you mix and handle the dough, the more you develop the gluten, which leads to tough, chewy biscuits instead of tender, flaky ones. A shaggy, slightly under-mixed dough is your friend.
- Press, Don’t Twist: When you twist the biscuit cutter, you crimp and seal the edges of the dough. This prevents the layers from separating and rising, leaving you with shorter, denser biscuits. A clean, straight-down press is the way to go.
- Fresh Baking Powder: Baking powder can lose its power over time. To check if yours is still active, drop a little bit into a cup of hot water. If it fizzes up enthusiastically, you’re in business!
- Huddle for Softness: Placing your biscuits close together on the baking sheet helps them rise taller and keeps their sides super soft and fluffy—perfect for pull-apart biscuits!
Storage Instructions
Storing Freshly Baked Biscuits
- Room Temperature: Biscuits are truly at their peak the day they’re made. If you have leftovers, you can store them in an airtight container at room temperature for up to 2 days.
- Reheating: To bring them back to life, pop them in a 350°F oven for about 5-7 minutes. This will warm them through and re-crisp the outside. A microwave works in a pinch, but you’ll lose that lovely texture.
Make-Ahead & Freezing Instructions
This is one of my favorite features of this make-ahead easy biscuit recipe!
- Freezing Unbaked Biscuits: After cutting the biscuits (step 6), place them on a parchment-lined baking sheet and pop them in the freezer until solid, about 1-2 hours. Transfer the frozen biscuits to a freezer-safe bag or container. They’ll keep for up to 3 months! To bake from frozen, place them on a baking sheet and bake at 425°F, adding about 5-8 minutes to the original baking time.
- Freezing Baked Biscuits: Let the biscuits cool completely, then wrap them tightly in plastic wrap and place them in a freezer bag. They can be frozen for up to 3 months. Thaw at room temperature and reheat in the oven as directed above.
Frequently Asked Questions (FAQ)
Why are my biscuits dense and tough?
This is almost always due to one of two things: the butter was too warm, or the dough was over-mixed. Warm butter melts into the flour instead of creating steam pockets, and overworking the dough develops too much gluten. Remember to keep everything cold and mix just until combined!
Why didn’t my biscuits rise?
There are a few culprits here! It could be expired baking powder (always check the date!), overworking the dough, or twisting the biscuit cutter when you cut them out, which seals the edges.
Can I make these into drop biscuits?
Absolutely! For a super quick, no-roll version, just increase the buttermilk by a couple of tablespoons to create a stickier dough. Then, simply drop heaping spoonfuls onto your prepared baking sheet and bake as directed. Easy peasy!
Can I make these dairy-free?
Yes, you can. Use a high-quality, firm vegan butter and make sure it’s frozen just like you would with regular butter. For the buttermilk, you can use the same DIY trick with your favorite unsweetened non-dairy milk (like almond or soy milk) and a tablespoon of lemon juice or vinegar.
Conclusion
And there you have it! A simple, rewarding, and incredibly delicious recipe for homemade flaky biscuits. They are the perfect vessel for a pat of butter and a drizzle of honey, a spoonful of jam, or smothered in savory sausage gravy. There’s really no wrong way to eat them!
I can’t wait for you to try this in your own kitchen. If you make this easy biscuit recipe, please let me know how it turned out! Leave a comment and a star rating below—it means the world to me. Happy baking!
I am a passionate recipe developer and food enthusiast specializing in heart-warming traditional dishes and simple, everyday meals. My goal is to inspire you to find joy and confidence in the kitchen through my easy-to-follow recipes.