Rayquaza Donut Recipe: Catch These Delicious Treats!
Get ready to soar to new heights of deliciousness with our epic Rayquaza Donut Recipe! Inspired by the legendary Pokémon, these vibrant green donuts are not only a feast for the eyes but also a delightful treat for your taste buds. Perfect for Pokémon-themed parties, a fun weekend baking project, or just satisfying your inner trainer, these donuts are guaranteed to be a hit! I’ve been dreaming up a way to bring the power of Rayquaza into my kitchen, and I think we’ve finally landed on something truly special.
Why You’ll Love This Recipe
- Unleash Your Inner Trainer: A fun and creative way to celebrate your love for Pokémon. Who doesn’t want to munch on a legendary after a long day of catching ’em all?
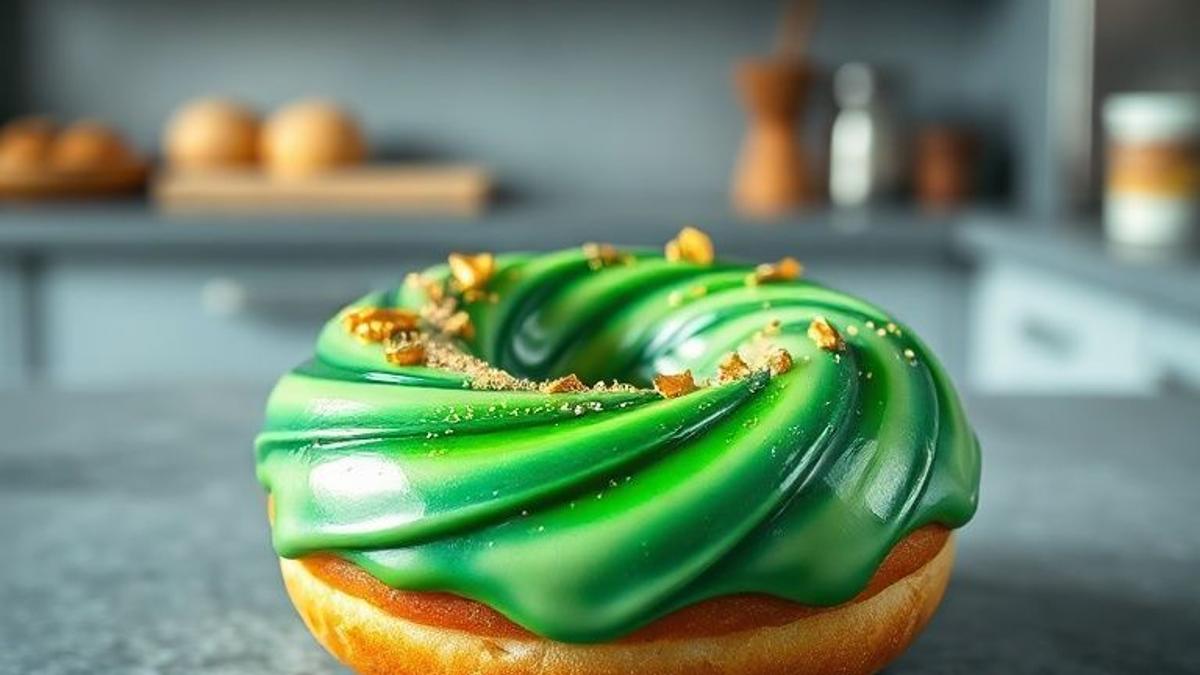
- Visually Stunning: The striking green glaze and signature swirls mimic Rayquaza’s iconic appearance. Seriously, these are almost too pretty to eat… almost.
- Easy-to-Follow: Perfect for bakers of all skill levels, from beginner to seasoned pro. You’ve got this!
- Customizable: Easily adapt the colors and decorations to your favorite Pokémon or color scheme. Feeling Charizard? Go for orange! Need a Squirtle vibe? Blue it is!
- Deliciously Fluffy: A tender, airy donut base that’s perfect for soaking up delicious glaze. The texture is just chef’s kiss.
Ingredient List
For the Donuts:
- All-Purpose Flour: About 4 cups, the sturdy foundation of our fluffy donuts.
- Granulated Sugar: 1/2 cup, for sweetness and a tender crumb that melts in your mouth.
- Active Dry Yeast: 2 and 1/4 teaspoons, the magic leavening agent that brings these donuts to life.
- Warm Milk (105-115°F): 1 cup, it activates the yeast and adds a lovely richness. Don’t make it too hot, or you’ll kill our little yeast friends!
- Eggs: 2 large, for structure and that extra bit of richness that makes donuts irresistible.
- Unsalted Butter, Melted: 1/4 cup, adds moisture and that glorious buttery flavor.
- Salt: 1 teaspoon, it might seem small, but it enhances all the other flavors.
- Vanilla Extract: 1 teaspoon, for that classic, comforting sweet aroma.
- Vegetable Oil or Shortening: About 4-6 cups, for frying (ensure it has a high smoke point so you don’t have any kitchen mishaps!).
For the Rayquaza Glaze:
- Powdered Sugar: 2 cups, the smooth, sweet base of our glaze. Sift it if you’re feeling fancy!
- Milk or Water: 3-4 tablespoons, to achieve that perfect drizzling consistency. Start with less and add more as needed.
- Green Food Coloring (Gel or Liquid): A few drops, to achieve Rayquaza’s signature vibrant green. Gel is usually more potent!
- Yellow Food Coloring (Optional): Just a drop or two, for those iconic yellow accents.
- Black Food Coloring (Optional): A tiny bit, for fine detailing if you’re going for a more intricate look.
For Decoration (Optional):
- Black Decorating Gel or Icing: For those piercing eyes and that signature mouth.
- Yellow Decorating Gel or Icing: For the belly stripes that make Rayquaza so recognizable.
- Edible Glitter (Green or Silver): For a touch of celestial sparkle that hints at its sky-dwelling nature.
Step-by-Step Instructions
Making the Donut Dough:
- Activate the Yeast: Grab a small bowl. Combine that warm milk, a tiny pinch of sugar (just a teaspoon from the main amount), and your active dry yeast. Give it a gentle stir and let it sit for 5-10 minutes. You’re looking for a nice, foamy cap – that tells you your yeast is alive and ready to party!
- Combine Wet Ingredients: In a big ol’ bowl, whisk together your eggs, that lovely melted butter, and the vanilla extract. Get it all nicely incorporated.
- Combine Dry Ingredients: In a separate bowl, whisk together your flour, the rest of the granulated sugar, and the salt. This ensures everything is evenly distributed.
- Mix the Dough: Now, pour that activated yeast mixture into the bowl with your wet ingredients. Then, gradually add your dry ingredients. Mix it all up until you have a shaggy, slightly messy dough. Don’t worry about perfection here, just get it combined.
- Knead the Dough: Turn that shaggy dough out onto a lightly floured surface. It’s time to get your hands in there and knead for about 8-10 minutes. You want it to become smooth and elastic, like a well-trained Pokémon itself. It should spring back when you poke it gently.
- First Rise: Grease a clean bowl with a little oil. Place your kneaded dough in the bowl, turning it to coat. Cover it snugly with plastic wrap. Find a warm, cozy spot for it to rise for 1-1.5 hours, or until it’s doubled in size. Patience, my friends!
- Shape the Donuts: Once doubled, gently punch down the dough to release the air. On a lightly floured surface, roll it out to about ½ inch thickness. Now for the fun part! Use a donut cutter to create your shapes. If you don’t have one, two round cutters of different sizes will work perfectly.
- Second Rise: Place your beautifully shaped donuts on baking sheets lined with parchment paper. Loosely cover them with plastic wrap. Let them rise again for another 30-45 minutes. They’ll get puffy and ready for their fry!
Frying the Donuts:
- Heat the Oil: In a large, heavy-bottomed pot or Dutch oven, heat your vegetable oil or shortening to 350-375°F (175-190°C). A candy thermometer is your best friend here to keep that temperature steady!
- Fry the Donuts: Carefully, and I mean carefully, place 2-3 donuts at a time into the hot oil. Don’t overcrowd the pot! Fry them for about 1-2 minutes per side, until they’re a gorgeous golden brown. They cook fast, so watch them closely!
- Drain: Using a slotted spoon, gently remove the fried donuts from the oil. Place them on a wire rack lined with paper towels to drain off any excess oil. This is where they get that perfect crisp exterior.
Glazing and Decorating:
- Prepare the Glaze: In a medium bowl, whisk together the powdered sugar and 3 tablespoons of milk or water until it’s smooth. Gradually add more liquid, a teaspoon at a time, until you reach a nice, thick but pourable consistency. Now, add your green food coloring until you get that perfect Rayquaza green. For the accents, prepare small bowls with your yellow and black glaze or icing.
- Glaze the Donuts: Make sure your donuts are completely cool before you start glazing. Dip each cooled donut into the green glaze, letting the excess drip back into the bowl. You want a nice, even coating.
- Add Details: While the green glaze is still wet, it’s time to get creative! Use your yellow decorating gel for the belly stripes and black decorating gel for the eyes and mouth. If you’re feeling adventurous, you can even use a toothpick to swirl some yellow into the green glaze for a cool, marbled effect.
- Optional Sparkle: Before the glaze fully sets, give them a sprinkle of edible glitter. It adds a touch of magic, don’t you think?
Baker’s Tips / Pro Tips for Success
- Don’t Over-Knead: Over-kneading can result in tough donuts. Stop when the dough is smooth and elastic, not when your arms are falling off!
- Temperature is Key for Yeast: Ensure your milk is the correct temperature to activate the yeast without killing it. Too hot is a no-go!
- Patience with Rising: Allow the dough to rise fully. This is crucial for light and airy donuts. Don’t rush the process!
- Frying Temperature Control: Maintaining the correct oil temperature is vital. Too low and donuts will be greasy; too high and they’ll burn before cooking through. Seriously, use a thermometer!
- Cool Completely Before Glazing: Glazing warm donuts will result in a melted, messy glaze that just slides right off. Let them cool completely on the wire rack.
- Gel Food Coloring is Best: Gel food coloring provides more vibrant colors and requires less product, preventing the glaze from becoming too thin. It’s worth the investment for truly stunning results!
Storage Instructions
- Store your beautifully crafted Rayquaza Donuts in an airtight container at room temperature for up to 2 days. They’re best enjoyed fresh, but leftovers are still pretty darn good!
- For longer storage, they can be frozen. Wrap them tightly in plastic wrap and then in foil. Thaw them at room temperature and, if you want that fresh-from-the-fryer feel, you can always re-glaze them!
Frequently Asked Questions (FAQ)
- Can I bake these donuts instead of frying? Yes, you absolutely can! Prepare your donut batter as usual, fill greased donut pans about two-thirds full, and bake at 375°F (190°C) for 10-12 minutes, or until a toothpick inserted comes out clean. Baked donuts will have a different texture, but they’re still delicious!
- What if I don’t have a donut cutter? No worries! You can use two round cookie cutters of different sizes – a larger one for the outer ring and a smaller one for the hole. Or, if you’re feeling artistic, you can simply shape them into rings by hand. Embrace the handmade charm!
- Can I make the dough ahead of time? You sure can! After the first rise, you can punch down the dough, wrap it tightly, and refrigerate it for up to 24 hours. Just bring it to room temperature for about 30 minutes before you’re ready to shape and fry.
- How do I get the glaze to be the perfect consistency? The secret is to start with less liquid and add more a teaspoon at a time until you reach a thick but pourable consistency that coats the back of a spoon nicely. You’re aiming for a glaze that flows, but not so much that it drips off too quickly.
Conclusion
There you have it – your very own Rayquaza Donuts, ready to take flight from your kitchen! These legendary treats are more than just a dessert; they’re an adventure waiting to happen. So, gather your ingredients, unleash your creativity, and get ready to catch these incredibly delicious and visually striking Rayquaza Donuts. Happy Baking, trainers! I can’t wait to see your creations!
I am a passionate recipe developer and food enthusiast specializing in heart-warming traditional dishes and simple, everyday meals. My goal is to inspire you to find joy and confidence in the kitchen through my easy-to-follow recipes.