Hey there, fellow food lovers! It’s your favorite baker from scooks.com, and can you feel it? That crisp autumn air, the rustling leaves… Halloween is just around the corner! When the spooky season gets busy, I’m always on the hunt for a treat that’s big on fun but low on fuss. And let me tell you, I’ve found the perfect one. I am so excited to share my absolute favorite Halloween treat with you: these adorable and delicious cute Halloween spider cookies with peanut butter!
Read Also: Spooktacular Halloween Dirt Cups (Easy Oreo Recipe!)
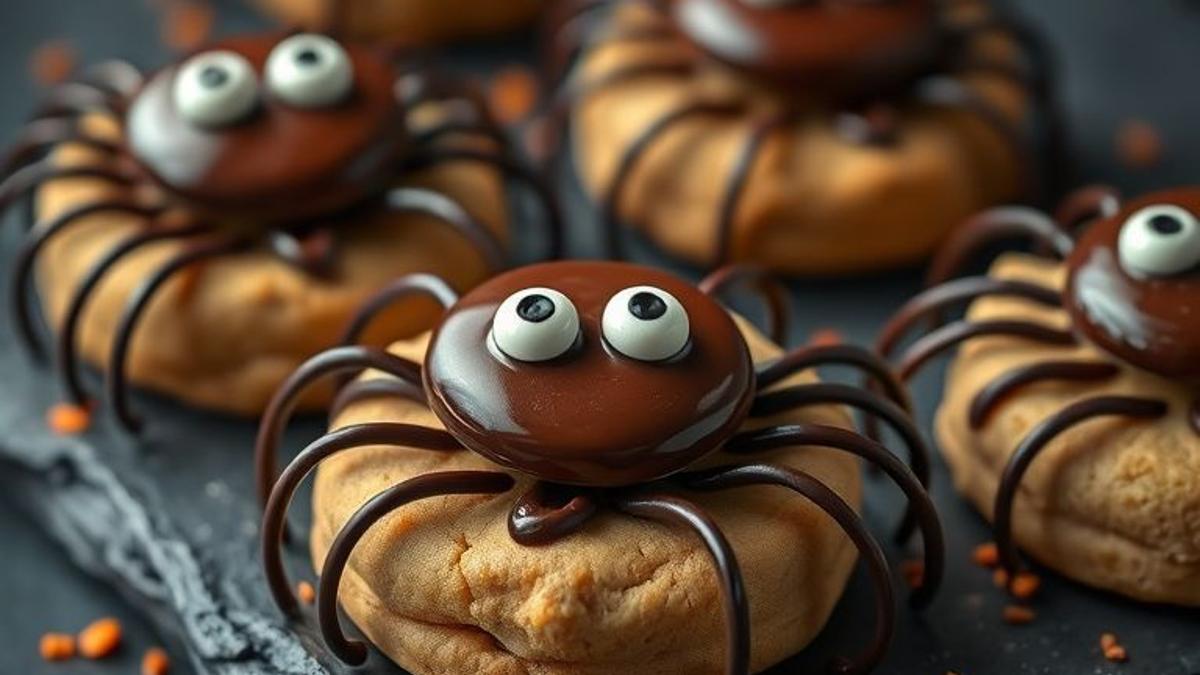
Seriously, these cookies are a lifesaver. The best part? It’s a completely no-chill recipe, which means you can whip them up for a last-minute party or a spontaneous baking session with the kids. We’re talking about a soft, incredibly chewy peanut butter cookie base that gets topped with a melty chocolate peanut butter cup for the body. Add a couple of silly googly eyes and some chocolate legs, and you’ve got a treat that’s more sweet than spooky. Let’s get baking!
Why You’ll Love This Recipe
Incredibly Easy & Fun
You don’t need to be a pro baker to nail this recipe. The steps are super simple, and decorating the spiders is a fantastic activity to get the kids involved. Their little faces light up when they bring these crawly critters to life! It’s pure Halloween magic.
No-Chill Cookie Dough
I said it before, and I’ll say it again because it’s a game-changer! No waiting around for dough to chill in the fridge. You can literally go from mixing bowl to oven in minutes. Perfect for when that cookie craving strikes!
The Perfect Halloween Party Food
Ever wondered what to bring to the school Halloween party or a neighborhood potluck? These cute Halloween spider cookies with peanut butter are a guaranteed hit. They’re crowd-pleasing, easy to transport, and so much fun to look at. Everyone, from toddlers to grandparents, will be reaching for one.
Classic Flavor Combination
Let’s be real, is there anything better than peanut butter and chocolate? It’s a match made in flavor heaven. The rich, salty peanut butter cookie combined with the sweet, creamy chocolate candy is just irresistible.
Ingredient List
For the Peanut Butter Cookies
- All-Purpose Flour: 1 ½ cups. My secret tip for perfectly soft cookies is the spoon-and-level method. Use a spoon to fluff up your flour, then gently scoop it into your measuring cup and level it off with a knife. This prevents a dense, dry cookie!
- Baking Soda: ¾ teaspoon. This gives our cookies the perfect little lift.
- Fine Sea Salt: ½ teaspoon. It’s essential for balancing all that sweetness.
- Unsalted Butter: ½ cup (1 stick), softened to room temperature. If you only have salted butter, just reduce the added salt to ¼ teaspoon.
- Creamy Peanut Butter: ¾ cup. For the best texture, you’ll want to use a standard commercial brand like Jif or Skippy. The natural, oily kind can make the cookies spread too much.
- Granulated Sugar & Light Brown Sugar: ½ cup of each. This dynamic duo creates a wonderfully soft and chewy cookie with those slightly crisp edges we all love.
- Large Egg: 1, at room temperature. This helps bind the dough together beautifully.
- Vanilla Extract: 1 teaspoon. For that extra little boost of warm flavor!
For the Cute Spider Decorations
- Chocolate Peanut Butter Cups: About 24, miniature size. I love using the classic Reese’s, but any small chocolate candy like a Rolo or a Hershey’s Kiss would also work!
- Semi-Sweet Chocolate Chips or Melting Wafers: ½ cup. This is for drawing on those eight little legs and acting as the “glue” for the eyes.
- Candy Eyeballs: About 48. You can usually find these in the baking aisle of most grocery stores, especially around Halloween, or you can easily order them online. No eyeballs? No problem! A dot of white frosting works great, too.
Step-by-Step Instructions
Step 1: Prep Your Oven and Ingredients
First things first, let’s get that oven roaring! Preheat it to 375°F (190°C). Go ahead and line two large baking sheets with parchment paper for easy cleanup. In a medium bowl, whisk together your all-purpose flour, baking soda, and salt. Just set that aside for now.
Step 2: Make the Peanut Butter Cookie Dough
In a large bowl with an electric mixer (or in a stand mixer), beat the softened butter, granulated sugar, and brown sugar on medium-high speed until it’s light and fluffy, about 2-3 minutes. Scrape down the sides of the bowl, then beat in the creamy peanut butter until it’s fully combined. Next, add the room temperature egg and vanilla extract, mixing on low until they’re just incorporated. You don’t want to overmix here! Finally, gradually add your dry ingredient mixture to the wet ingredients, mixing on low speed until a soft, wonderful dough forms.
Step 3: Bake the Cookies
Time to get rolling! Scoop the dough and roll it into 1.5-inch balls. Place them about 2 inches apart on your prepared baking sheets. For that classic peanut butter cookie look, you can use a fork to gently press a crisscross pattern onto each cookie. This is totally optional but I think it adds a nice touch! Bake for 10-12 minutes. You’re looking for edges that are lightly golden brown. The centers might look a smidge underdone, but that’s the secret to a chewy cookie!
Step 4: Assemble Your Cute Halloween Spider Cookies!
This is where the magic happens, so you’ve got to move quickly! As soon as the cookies come out of the oven, immediately and gently press one unwrapped miniature peanut butter cup into the center of each warm cookie. The warmth will make it meld perfectly. Let the cookies cool on the baking sheet for a few minutes before transferring them to a wire rack to cool completely.
Once they’re cool, melt your chocolate chips in a microwave-safe bowl in 30-second intervals, stirring in between, until it’s smooth and luscious. Transfer that melted chocolate to a piping bag or a simple zip-top bag with a tiny corner snipped off. Use a small dot of the melted chocolate to “glue” two candy eyeballs onto the peanut butter cup body. Then, carefully pipe eight small legs on each cookie—four on each side—extending from the chocolate body. Let the chocolate set completely before serving up your spooky creations!
Baker’s Tips for the Best Cute Halloween Spider Cookies with Peanut Butter
- Use Room Temperature Ingredients: I can’t stress this enough! Using softened butter and a room temperature egg is the key to a smooth, evenly mixed dough. It really does make a difference in the final texture.
- Don’t Overbake: For that ultimate chewy, soft center, pull the cookies from the oven when the edges are set and golden. They will continue to bake a little on the hot pan as they cool.
- Press Chocolates In While Warm: This is the most important assembly step! Pressing the peanut butter cup into the hot-from-the-oven cookie helps it adhere and gets it just a little bit melty and delicious.
- Practice Your Piping: Feeling a little nervous about piping the spider legs? I get it! Just do a few practice squiggles on a piece of parchment paper first. It helps you get a feel for the pressure and flow before you commit to the cookie.
- Chill to Set: In a hurry to serve your masterpieces? You can pop the finished cookies in the refrigerator for 10-15 minutes to help the chocolate legs set up much faster.
Storage Instructions
- Room Temperature: Store your finished spider cookies in an airtight container. They’ll stay fresh and delicious at room temperature for up to 5 days.
- Freezing Baked Cookies: You can absolutely freeze these! Place the decorated cookies in a single layer on a baking sheet until they’re solid, then transfer them to a freezer-safe bag or container. They’ll keep for up to 3 months. Just thaw them at room temperature when you’re ready to enjoy.
- Freezing Cookie Dough: Want fresh-baked cookies on demand? Roll the dough into balls and freeze them on a baking sheet. Once they’re solid, toss them into a freezer bag. You can bake them right from frozen—just add an extra 2-3 minutes to the baking time.
Frequently Asked Questions (FAQ)
Can I use natural peanut butter for this recipe?
I really recommend using a processed, no-stir peanut butter (like Jif or Skippy) for this recipe. Natural peanut butter tends to be oilier and can cause the cookies to spread too much, losing that perfect shape.
What can I use if I can’t find candy eyeballs?
Get creative! If the candy eyeballs are playing hide-and-seek at the store, you can use tiny dots of white icing with an even smaller dot of black icing or a sprinkle in the center. Mini white chocolate chips with a dot of melted chocolate also work in a pinch!
Can I make these cookies gluten-free?
Yes, you certainly can! To make these gluten-free, simply substitute the all-purpose flour with a good quality 1-to-1 gluten-free baking flour blend. Look for one that already contains xanthan gum for the best results.
My chocolate is too thick to pipe the legs. What should I do?
It happens! If your melted chocolate is giving you trouble and feels too thick for piping, just stir in a tiny amount—start with about 1/4 teaspoon—of coconut oil or vegetable shortening. It will thin it out to the perfect, silky consistency for drawing those little legs.
Happy Halloween Baking!
And there you have it! The most adorable, easy, and delicious Halloween treat you’ll make all season. I just know you’re going to have a blast making these cute Halloween spider cookies with peanut butter for your spooky celebrations. They are always the first thing to disappear from the dessert table!
If you make these, I would absolutely love to see them! Please leave a comment and a rating below to let me know how they turned out. And don’t forget to share a photo of your creations on social media and tag us @scooks.com! Happy Haunting!
I am a passionate recipe developer and food enthusiast specializing in heart-warming traditional dishes and simple, everyday meals. My goal is to inspire you to find joy and confidence in the kitchen through my easy-to-follow recipes.