Hey everyone, and welcome back to scooks.com! With the air getting crisp and spooky season just around the corner, my kitchen is officially in full-on Halloween mode. And let me tell you, I have the most ridiculously easy and fun treat for you today. We’re taking those iconic Halloween Cookies Pillsbury makes—you know, the ones with the cute little ghosts and pumpkins printed on them—and giving them a seriously delicious upgrade. We’re talking a warm, gooey center of melted chocolate and caramel hidden inside a soft, chewy sugar cookie. Seriously, what’s not to love? These little ghosts are the perfect shortcut recipe for any Halloween party, and they look like you spent hours on them. But don’t worry, your secret is safe with me!
Read Also: 40+ Easy Halloween Desserts (Spooky, Fun & Cute Ideas!)
Why You’ll Love This Halloween Cookies Pillsbury Recipe
Ever find yourself wanting to bake something festive but you’re just totally short on time? This recipe is your new best friend. It’s all about maximum fun with minimum fuss, and the results are absolutely spooktacular.
- The Ultimate Shortcut: Let’s be real, sometimes you just don’t have the energy to break out the flour and mixer. This recipe starts with pre-made dough, so all the hard work is already done! It’s a guaranteed win for busy parents and anyone who wants a delicious treat without the mess.
- A Spooky Surprise Inside: The best part? That hidden center! Biting into a warm cookie and discovering a pool of melted chocolate and caramel is pure magic. It takes these cookies from simple to simply unforgettable.
- Perfect for Parties: These are the cutest things you’ll ever see on a dessert table. Because they’re individual little ghosts, they are super easy for guests to grab and enjoy. They’re a total showstopper, and everyone will be asking you for the recipe.
- Kid-Friendly Fun: This is one of my favorite recipes for getting my kids in the kitchen. Their little hands are perfect for wrapping the dough around the candy. They’ll have an absolute blast stuffing, rolling, and then decorating their own ghostly creations.
Ingredients You’ll Need
This ingredient list is short and sweet, just the way we like it! You can find everything you need at pretty much any grocery store, especially during the fall.
For the Stuffed Cookies:
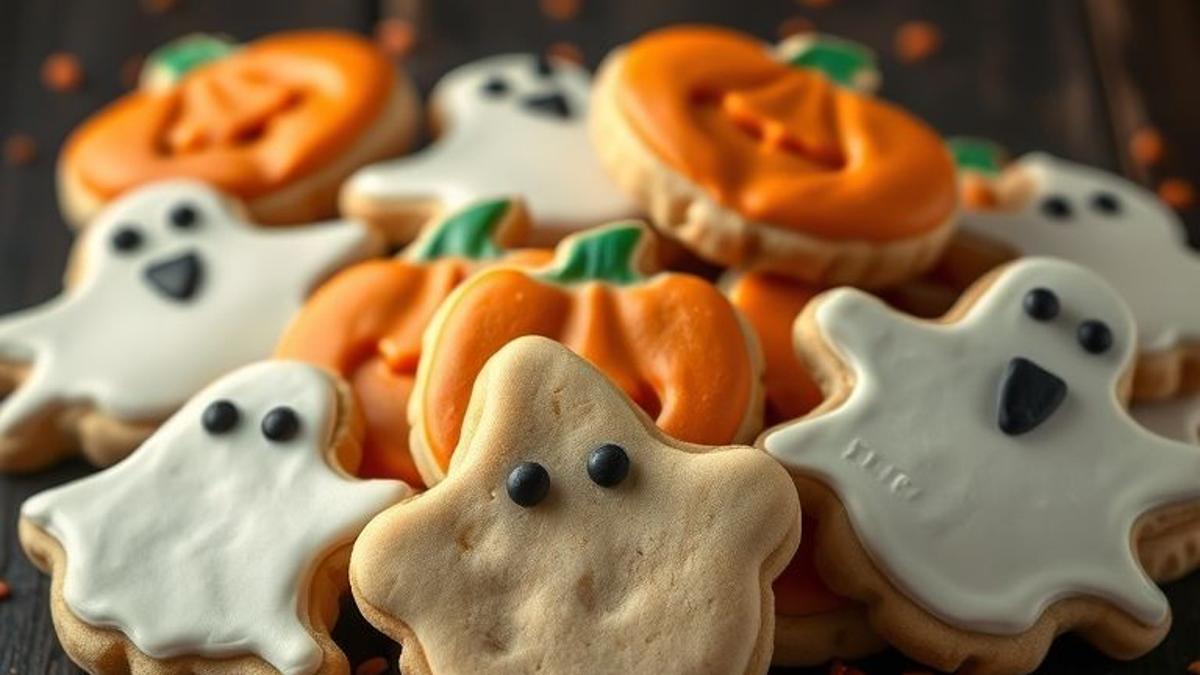
- Pillsbury™ Shape™ Halloween Sugar Cookie Dough: One 24-count package. I love using the ghost shapes for this, but the pumpkins work just as well!
- Chocolate Caramel Candies: About 12 Rolo® candies, unwrapped.
For the Ghostly Decoration:
- White Candy Melts: One 12-ounce bag.
- Coconut Oil or Vegetable Shortening: 1 teaspoon (optional, but I highly recommend it for a super smooth coating).
- Black Decorating Icing: A small tube with a fine tip is perfect for drawing on those cute little faces.
Ingredient Notes & Substitutions:
- Cookie Dough: Can’t find the pre-cut Halloween Cookies Pillsbury dough? No problem at all! Just grab a roll of their regular sugar cookie dough and slice it into 24 even pieces. It works like a charm.
- Candy Filling: Get creative with the filling! Mini Reese’s Peanut Butter Cups are an incredible choice if you love that chocolate-peanut butter combo. Hershey’s Kisses or even chopped-up mini Snickers bars would also be fantastic.
- Decoration: If you don’t have black icing, you can use mini chocolate chips for the eyes. Just be sure to press them into the white coating while it’s still wet! A black food-safe marker also works once the coating has completely set.
Step-by-Step Instructions
Alright, let’s get baking! This process is so simple, you’ll have these done in no time.
Step 1: Prep for Baking
- First things first, preheat your oven to 350°F (175°C).
- Line a large cookie sheet with parchment paper. Trust me, this makes cleanup a breeze.
- Go ahead and unwrap all your Rolo candies so they’re ready to go.
Step 2: Stuff the Cookies
- This is the fun part! For each stuffed cookie, you’ll need two pieces of the pre-cut Pillsbury dough.
- Take one piece of dough and gently flatten it in the palm of your hand. Pop one Rolo right in the center.
- Place the second piece of dough on top. Pinch the edges together all around the candy, then roll the dough between your hands to form a nice, smooth ball. You want to make sure the candy is completely sealed inside!
- Place the dough ball on your prepared cookie sheet. Repeat with the rest of your dough, making sure to space the cookies about 2 inches apart so they have room to spread.
Step 3: Bake the Cookies
- Pop that cookie sheet into the preheated oven and bake for 12-15 minutes. You’re looking for the edges to be just lightly golden brown.
- Once they’re done, let the cookies cool on the baking sheet for about 5 minutes. This lets them set up a bit before you move them. Then, carefully transfer them to a wire rack to cool completely.
Step 4: Decorate Your Ghosts
- Patience is a virtue here—make sure your cookies are completely cool before you start this step!
- In a microwave-safe bowl, combine the white candy melts and the coconut oil. Heat in 30-second intervals, stirring really well after each one, until everything is melted and smooth.
- Dip the top of each cooled cookie into the melted white coating. Let any excess drip off before placing it back on the parchment paper to set.
- Once the white coating is firm to the touch (it shouldn’t take too long!), use your black decorating icing to draw two little eyes and a spooky mouth on each cookie. Let the icing set, and you’re ready to serve!
Baker’s Tips for Success
Want to make sure your cookies come out perfectly every single time? I’ve got a few tricks up my sleeve for you.
- Cool Cookies Completely: I’m saying it again because it’s so important! If you try to dip warm cookies, the heat will melt the coating and you’ll have a sad, drippy mess. Let them cool all the way down.
- Seal the Seams: Really make sure that candy is fully encased in the dough. Roll the ball between your hands until it’s smooth. This is the key to preventing that delicious, gooey filling from leaking out during baking.
- Don’t Overbake: For that perfect, lava-like center, you want to pull the cookies from the oven as soon as the edges are set. They might look a little soft in the middle, but they’ll continue to firm up as they cool on the pan.
- Smooth Coating Secret: Don’t skip the coconut oil or shortening! It’s my secret weapon for thinning the candy melts just enough to get a flawless, professional-looking finish without any clumps.
Storage Instructions
If you have any leftovers (which is a big if!), here’s how to keep them fresh.
- Room Temperature: Store your finished ghost cookies in a single layer in an airtight container for up to 3 days. If you absolutely have to stack them, place a sheet of parchment paper between the layers to protect the decorations.
- Freezer: You can freeze the baked, undecorated cookies for up to 2 months. Just thaw them completely at room temperature before you dip and decorate them.
Frequently Asked Questions (FAQ)
Can I use chocolate chip cookie dough instead?
Yes! A stuffed chocolate chip cookie would be absolutely delicious. Since that dough comes in a tube, you’ll just need to portion it out yourself. Slice the dough into 24 even pieces to match this recipe.
My white candy coating is too thick. How can I fix it?
This is an easy fix! Just add a tiny bit more coconut oil or shortening—start with about 1/4 teaspoon at a time—and stir until it reaches a smooth, dippable consistency. Be careful not to add too much at once.
Why did my candy filling leak out in the oven?
Oh no! This usually happens when there’s a small gap or seam in the dough that wasn’t fully sealed. When you’re forming your dough balls, take an extra second to make sure they’re rolled smoothly and there are no cracks where the candy can make a great escape.
Can I make these cookies ahead of time?
Absolutely! This is a great make-ahead recipe. You can bake the cookies a day in advance and store them in an airtight container. I recommend decorating them the day you plan to serve them for the best, freshest appearance.
Happy Halloween Baking!
And there you have it—the easiest, cutest, and most delicious ghost cookies you’ll ever make! This is such a fun way to elevate a simple package of store-bought dough into something truly special. I just know your family and friends are going to go wild for these gooey-centered treats. Making these upgraded Halloween Cookies Pillsbury style has become one of my favorite new traditions!
If you make these, I would absolutely love to see them! Share a photo of your creations on social media and tag us @scooks.com. Now I have to ask, what other candies would you love to stuff inside these cookies? Let me know in the comments below!
I am a passionate recipe developer and food enthusiast specializing in heart-warming traditional dishes and simple, everyday meals. My goal is to inspire you to find joy and confidence in the kitchen through my easy-to-follow recipes.