
Hey foodies! Welcome back to scooks.com. Today, I am SO excited to share a Poha recipe that completely changed my breakfast game. If you’re tired of the same old oatmeal or toast and crave something savory, vibrant, and incredibly fast, then you need to meet Poha.
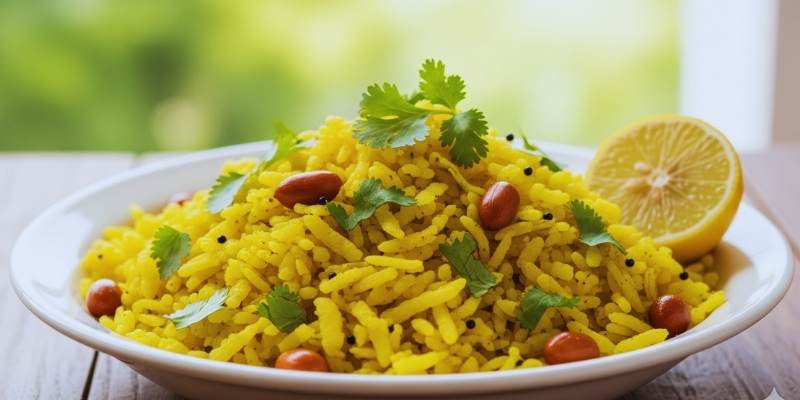
So, what is Poha? It’s a beloved breakfast dish from Western India made from flattened rice flakes. Think of it as a light, fluffy, and savory rice pilaf that comes together in under 20 minutes. It’s healthy, satisfying, and bursting with flavor. Ever wondered how to get a delicious, hot breakfast on the table on a busy weekday morning? This is your answer. This recipe is my tried-and-true method, perfected to be foolproof and absolutely delicious. Let’s get cooking!
Why You’ll Love This Poha Recipe
I could go on and on, but here’s the short and sweet version of why this dish will become a staple in your kitchen.
- Ready in a Flash: Seriously. From the moment you pull out your ingredients to that first glorious bite, you’re looking at 20 minutes, tops. It’s faster than delivery, I promise!
- Healthy & Satisfying: Poha is naturally gluten-free and super easy to make vegan. It’s light on the stomach but has enough substance to keep you full and energized until lunch.
- Packed with Flavor: We’re talking a symphony of flavors here. You get the pop of mustard seeds, the warmth of cumin, a tangy kick from fresh lemon, and a subtle hint of sweetness. It’s just perfect.
- Completely Customizable: Think of this recipe as your perfect starting point. I love it as is, but you can easily toss in other veggies, some scrambled tofu, or even leftover shredded chicken. You do you!
Ingredients You’ll Need
Getting your ingredients prepped is half the battle, and luckily, this list is simple! Here’s what you’ll need to grab.
For the Poha
- 2 cups Thick Poha (Flattened Rice): This is non-negotiable! Be sure to use thick poha, sometimes labeled Jada Poha. The thin variety is delicate and will turn to mush. Trust me on this one.
- 1/2 teaspoon Turmeric Powder: This gives the dish its beautiful, sunny golden color and a lovely earthy flavor.
- 1 teaspoon Salt: I use fine sea salt, but kosher salt works great too.
- 1 teaspoon Granulated Sugar: Just a pinch! This might sound odd, but it’s the secret to balancing all the savory and tangy flavors. Don’t skip it!
For the Tempering (Tadka)
- 2 tablespoons Avocado Oil: Or any neutral oil like canola or vegetable oil will work. For a richer, non-vegan version, you can absolutely use ghee.
- 1 teaspoon Black Mustard Seeds: These are essential! They pop in the hot oil and release a fantastic pungent flavor.
- 1 teaspoon Cumin Seeds: Adds that signature warm, nutty aroma that makes your kitchen smell amazing.
- 1/4 teaspoon Asafoetida (Hing): (Optional) Don’t be shy! A tiny pinch of this potent spice provides a unique savory, almost garlicky depth. If you can’t find it, no worries, you can leave it out.
- 10-12 Fresh Curry Leaves: (Optional but Highly Recommended) If you can find these at an Indian or Asian grocery store, get them! They add an incredible, fragrant aroma that is truly special.
- 1 Green Chili: I use a serrano, but a jalapeño works too. Finely chop it, and for less heat, be sure to remove the seeds.
- 1/2 cup Yellow Onion: Finely chopped.
Veggies & Finishing Touches
- 1 small Potato: Diced into small, 1/4-inch cubes. A waxy potato like Yukon Gold is my go-to because it holds its shape beautifully.
- 1/2 cup Frozen Peas: So easy. No need to even thaw them first, just toss them right in.
- 2 tablespoons Fresh Lemon Juice: Please, please use fresh! The brightness from a real lemon is key and can’t be replicated with the bottled stuff.
For Garnish (Highly Recommended)
- 1/4 cup Roasted Peanuts: For that wonderful, necessary crunch.
- 1/4 cup Fresh Cilantro: Roughly chopped. It adds a fresh, herby finish.
- 1/2 cup Sev: (Optional) These are crispy, fried chickpea flour noodles. They add amazing texture! You can find them in the international aisle of most large supermarkets or at an Indian grocery store.
Step-by-Step Instructions
Alright, let’s make some magic. Follow these simple steps for poha Recipe perfection.
Step 1: Prepare the Poha
- Place your 2 cups of thick poha in a fine-mesh strainer. Give it a good rinse under cool running water for about 20-30 seconds. I like to use my fingers to gently toss the flakes to make sure they all get wet. You want them to soften up, but not become waterlogged and mushy.
- Now, the important part: let the poha drain completely in the strainer for about 5-10 minutes. This allows it to absorb the residual moisture and become perfectly fluffy.
- Transfer the drained, softened poha to a large bowl. Sprinkle the turmeric powder, salt, and sugar over it. Use a fork or your hands to gently toss everything together, coating the flakes in that gorgeous yellow color. Set it aside while you work on the base.
Step 2: Make the Tempering (Tadka)
- Heat the oil in a large skillet or a wide pan over medium-high heat. You’ll know it’s ready when the oil shimmers slightly.
- Add the mustard seeds. This is the fun part! Wait for them to pop and sputter, which should take about 30-45 seconds. Once they’re popping, add the cumin seeds, asafoetida (if you’re using it), and fresh curry leaves. Sauté for just 30 seconds until everything is incredibly fragrant.
- Toss in the chopped onion and green chili. Cook, stirring every so often, until the onion softens and turns translucent, which usually takes about 3-4 minutes.
Step 3: Cook the Vegetables
- Add the diced potatoes to the skillet along with a small pinch of salt (this helps them cook!). Sauté for 5-7 minutes. You want the potatoes to be tender and cooked through. If you find they’re starting to stick, just add a tablespoon of water and pop a lid on the pan for a minute to let them steam.
- Stir in the frozen peas and cook for one more minute until they’re bright green and heated through.
Step 4: Combine and Serve
- Time to bring it all together! Add your prepared poha to the skillet with the cooked veggies.
- Gently toss and fold everything together until the poha is heated through and well combined with all the deliciousness in the pan. The key here is to be gentle—you don’t want to mash those beautiful, fluffy flakes.
- Turn off the heat. Stir in the fresh lemon juice and about half of your chopped cilantro.
- Serve it up hot, right away! Garnish each bowl with the rest of the cilantro, a generous handful of roasted peanuts, and a big sprinkle of sev for that irresistible crunch.
Pro Tips for Perfect Poha
Want to make sure your poha is flawless every single time? Keep these little secrets in your back pocket.
- The Golden Rule: Don’t Soak! I can’t stress this enough. The most common mistake people make is soaking the poha in a bowl of water. A quick rinse under running water is all it needs to hydrate perfectly. Soaking will give you a clumpy, mushy mess.
- Fluff, Don’t Stir: When you add the poha to the pan, use a gentle lifting and folding motion with a spatula or fork. Vigorous stirring will break the delicate flakes. Think fluffy, not pasty!
- Balance is Key: That tiny bit of sugar and the final squeeze of lemon juice are not just suggestions—they are crucial! They work together to create the signature sweet, tangy, and savory flavor profile that makes Poha so addictive.
- Prep Ahead: To make your morning even breezier, you can chop your onion, potato, and chili the night before. Store them in an airtight container in the fridge, and you’ll be ready to go!
Storage and Reheating
Got leftovers? No problem!
- To Store: Let the poha cool down to room temperature, then transfer it to an airtight container. It’ll keep in the refrigerator for up to 2 days. Just a heads-up, the texture is always best when it’s fresh, as the sev and peanuts will lose their crunch over time.
- To Reheat: The microwave is your friend here. Sprinkle the poha with a teaspoon of water (this helps it steam and prevents it from drying out), then microwave in 30-second bursts. Fluff it with a fork between intervals until it’s just heated through.
Poha Recipe FAQ
Why did my poha turn out dry?
This usually happens for one of two reasons: you either let the rinsed poha sit out for too long and it dried out completely, or you didn’t use quite enough oil in the pan. It’s an easy fix! While it’s still in the pan, just sprinkle a tablespoon of water over the dish and give it one last gentle toss before serving. That little bit of steam will bring it right back to life.
Can I add other vegetables?
Absolutely! Poha is a fantastic canvas for all sorts of veggies. Finely chopped carrots, bell peppers, or even corn are delicious additions. I recommend adding them to the pan at the same time as the potatoes to make sure they have enough time to cook until tender.
How can I make Poharecipe vegan?
Good news! This recipe is already naturally vegan. The only thing to watch for is your cooking fat—just make sure you’re using a plant-based oil (like avocado or canola) instead of ghee.
Where do I find thick poha flakes?
Your best bet is the international or Asian food aisle of a large, well-stocked grocery store. If you have an Indian or South Asian grocery market nearby, you’ll definitely find it there. Of course, online retailers are always a great option, too!
A Perfect Start to Any Day!
We hope you love this simple, flavorful Poha recipe as much as we do here at scooks.com! It’s such wonderful proof that a delicious, satisfying, and healthy breakfast doesn’t have to be complicated or time-consuming. It’s a hug in a bowl, and it’s ready when you are.
If you try this poha recipe, please be sure to leave a comment and a rating below to let us know how it went for you. We love hearing from you! Happy cooking!
I am a passionate recipe developer and food enthusiast specializing in heart-warming traditional dishes and simple, everyday meals. My goal is to inspire you to find joy and confidence in the kitchen through my easy-to-follow recipes.