
Hey there, fellow food lovers! It’s your friend from scooks.com, and today, I am over the moon excited to share something truly special with you. We’re not just baking a cake; we’re creating an edible work of art! Ever wanted to bake something that hits all the right notes for the musician in your life? Well, you’ve come to the right place. This bassoon cake recipe is the perfect tribute—a rich, decadent chocolate cake that’s not only a show-stopper but is also specifically designed to be sturdy and easy to carve. It’s perfect for a band recital after-party, a thoughtful gift for a music teacher, or the ultimate birthday surprise for your favorite bassoonist. Let’s make some music in the kitchen!
Why You’ll Love This Recipe
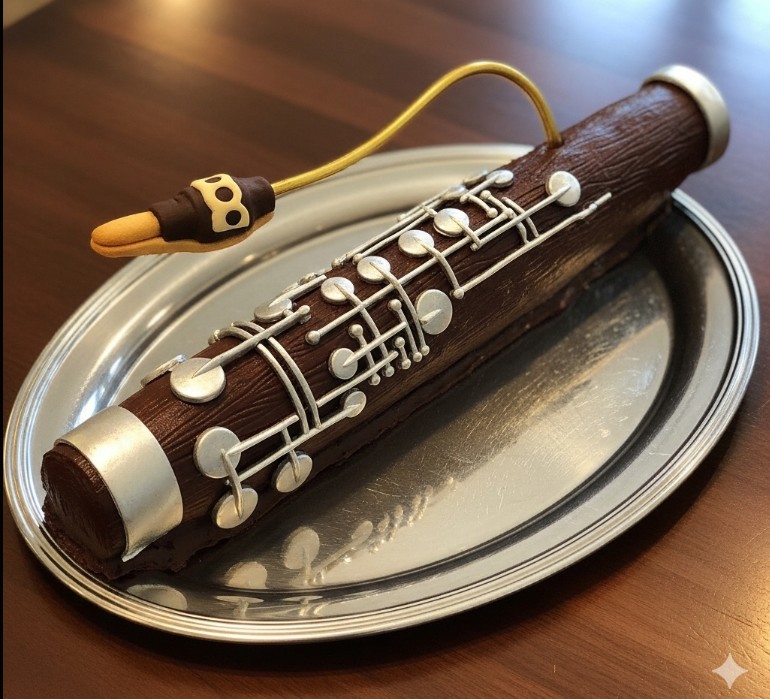
A True Show-Stopper
Honestly, get ready for the standing ovation. This isn’t just a cake; it’s a conversation piece, a centerpiece, and a memory in the making. When you walk into the room with this, everyone’s jaw will drop. It’s such a personal and creative way to celebrate a passion for music.
Surprisingly Simple to Decorate
Worried about carving a cake into a musical instrument? Please don’t be! I’ve broken down the entire shaping and decorating process into simple, totally manageable steps. You don’t need to be a professional pastry chef or have a drawer full of fancy tools. We’re keeping it fun and stress-free, I promise.
Deeply Rich & Chocolatey
Let’s be real: a novelty cake has to taste amazing, too. And this one delivers! Beneath that fun exterior is a seriously delicious, incredibly moist chocolate cake with a deep, complex flavor. We’ll pair it with a silky, rich chocolate buttercream that’s just heavenly. It’s a symphony of chocolate!
Easy-to-Find Ingredients
No need to go on a scavenger hunt for this recipe. We’re using simple, standard pantry and fridge staples that you probably already have on hand. It’s all about creating something extraordinary from everyday ingredients.
Ingredient List
For the Chocolate Bassoon Cake
- All-Purpose Flour: 2 cups
- Unsweetened Dutch-Process Cocoa Powder: 3/4 cup
- Baking Soda: 2 teaspoons
- Baking Powder: 1 teaspoon
- Salt: 1 teaspoon
- Espresso Powder (Optional): 1 tablespoon
- Unsalted Butter: 1/2 cup (1 stick), at room temperature
- Granulated Sugar: 1 cup
- Brown Sugar: 1 cup, packed
- Large Eggs: 2, at room temperature
- Vanilla Extract: 2 teaspoons
- Buttermilk: 1 cup, at room temperature
- Hot Coffee or Water: 1 cup
For the Rich Chocolate Buttercream
- Unsalted Butter: 1 1/2 cups (3 sticks), softened
- Powdered Sugar: 4 cups, sifted
- Unsweetened Dutch-Process Cocoa Powder: 1 cup, sifted
- Heavy Cream or Milk: 1/4 to 1/2 cup
- Vanilla Extract: 2 teaspoons
- Pinch of Salt: 1/4 teaspoon
For Decoration (The Fun Part!)
- Silver Dragees or Silver Sanding Sugar: For the bassoon’s keys.
- Chocolate Pirouette Cookie: Makes the perfect edible “bocal”.
- Small Wafer Cookie (like Nilla Wafer): Easily shaped into the “reed”.
Ingredient Notes & Substitutions
- Buttermilk: Don’t have any? No worries! Just add 1 tablespoon of white vinegar or lemon juice to 1 cup of regular milk and let it stand for 5-10 minutes. It’ll curdle slightly and be ready to use.
- Dutch-Process Cocoa: You can use natural unsweetened cocoa powder if that’s what you have. Your cake will just have a slightly lighter, reddish color and a tangier flavor. Still delicious!
- Coffee: I love using coffee because it makes chocolate taste more… well, chocolatey! But if you’re not a fan or are baking for kids, hot water works perfectly fine.
Step-by-Step Instructions
Phase 1: Bake the Sturdy Chocolate Cake
- Prep: First things first, get your oven preheating to 350°F (175°C). Grab a 9×13 inch baking pan, grease and flour it really well, and line the bottom with parchment paper. This little step ensures your cake will pop right out.
- Combine Dry Ingredients: In a medium bowl, whisk together the flour, cocoa powder, baking soda, baking powder, salt, and that optional (but highly recommended!) espresso powder. Whisking helps get rid of any lumps.
- Cream Butter & Sugars: In a large bowl with your stand mixer or a hand mixer, beat the room temperature butter with the granulated and brown sugars on medium-high speed. You’re looking for it to get light in color and fluffy in texture, which usually takes about 3-4 minutes.
- Add Eggs & Vanilla: Add the eggs one at a time, making sure to beat well after each one. This helps them incorporate fully. Then, mix in your vanilla extract.
- Alternate Wet & Dry: Turn your mixer down to low. Add about one-third of your dry ingredient mixture, then half of the buttermilk. Repeat this, ending with the last bit of the dry ingredients. The key here is to mix only until it’s just combined. Overmixing can make the cake tough!
- Add Hot Liquid: Now, this is important. With the mixer still on low, carefully and slowly stream in the hot coffee or water. The batter will be quite thin—that’s exactly what you want! This is the secret to a super moist cake.
- Bake: Pour that beautiful batter into your prepared pan and use a spatula to smooth the top. Pop it in the oven and bake for 35-40 minutes. You’ll know it’s done when a wooden skewer or toothpick inserted into the center comes out clean.
- Cool: Let the cake cool in the pan on a wire rack for about 15 minutes. Then, carefully flip it out onto the rack to cool completely. For this specific bassoon cake recipe, chilling the cake before carving is a game-changer.
Phase 2: Whip the Chocolate Buttercream
- Beat Butter: In a large bowl, use your mixer to beat the softened butter until it’s perfectly creamy and smooth.
- Add Powders: Sift in the powdered sugar and cocoa powder. Why sift? It guarantees the smoothest, silkiest buttercream without any little lumps. Mix on low speed until the powders are incorporated.
- Add Liquids: Pour in 1/4 cup of the heavy cream, the vanilla, and the salt.
- Whip: Crank the mixer speed up to medium-high and let it go for a full 3-5 minutes. This is what makes the buttercream so light and fluffy. If it seems too thick, add more cream, one tablespoon at a time.
Phase 3: Assemble & Decorate Your Bassoon Cake
- Carve the Shape: Place your completely cooled (and preferably chilled!) cake on a large cutting board. Using a long, sharp serrated knife, carefully carve out the long, tapered shape of a bassoon. I find it helpful to look at a simple picture online. Don’t stress about perfection! The frosting will hide any little imperfections.
- Apply the Crumb Coat: Move your carved cake to its final serving platter or a cake board. Using an offset spatula, spread a very thin layer of chocolate buttercream over the entire surface. This is the crumb coat, and it’s a magical step that traps all the loose crumbs. Pop the cake in the fridge for about 30 minutes to let it set.
- Final Frosting: Once the crumb coat is firm, apply a second, much more generous layer of buttercream. Smooth it out as best you can with your spatula for a clean, polished look.
- Add the Details: This is the best part! While the frosting is still soft, gently press the silver dragées or sprinkle the sanding sugar on to create the bassoon’s keys. Place the pirouette cookie at the top to act as the bocal, and then gently press the small wafer cookie (you might need to nibble it into a reed shape!) onto the end of the pirouette. Voila!
Baker’s Tips / Pro Tips for Success
Chill Before You Carve
A cold cake is a firm cake, my friends. Chilling your baked cake for at least an hour in the fridge (or even 30 minutes in the freezer) makes it so much easier to carve clean lines without it crumbling into a mess.
Don’t Skip the Crumb Coat
I know it feels like an extra step, but trust me, the crumb coat is the secret to a professional-looking cake. It locks in all those pesky crumbs so your final layer of frosting is beautifully smooth and crumb-free.
Use a Paper Template
Feeling a little nervous about carving it freehand? No problem at all! Just print a simple outline of a bassoon from the internet, cut it out, and lay the paper template on top of your cake. You can use it as a stencil to guide your knife. So easy!
Room Temperature Ingredients are a Must
For the most luscious cake texture and the smoothest buttercream, you really want to make sure your butter, eggs, and buttermilk are all at room temperature. This allows them to blend together seamlessly into a perfect emulsion.
The “No-Carve” Sheet Cake Version
Want to capture the spirit of the cake without any of the carving? I’ve got you! Just frost the entire 9×13 sheet cake as is. Then, use your decorative elements—the silver dragées for keys and the cookies for the bocal and reed—to simply “draw” the shape of a bassoon right on top of the frosting. It’s just as fun and totally stress-free.
Storage Instructions
Room Temperature
Your finished bassoon cake can be stored in an airtight container at room temperature for up to 3 days. The flavor is actually best when it’s not chilled!
Refrigerator
If your kitchen is particularly warm, it’s safer to store the cake in the fridge for up to 5 days. Just be sure to let it sit out on the counter for about 30 minutes before serving to let the buttercream soften and the cake’s flavor shine.
Make-Ahead & Freezing
Planning ahead is always a good idea! You can bake the cake layer, let it cool completely, and then wrap it tightly in plastic wrap and a layer of foil. It keeps for a day at room temperature, 3 days in the fridge, or up to 3 months in the freezer. The buttercream can also be made ahead and stored in an airtight container in the fridge for up to a week. Just let it come to room temp and give it a good re-whip before frosting.
Frequently Asked Questions (FAQ)
Can I use a different cake flavor?
Absolutely! While I love the deep chocolate, a sturdy vanilla or yellow butter cake would work wonderfully for carving. Look for recipes that are a bit dense, like a pound cake, as they hold their shape the best.
What if I don’t have silver dragées for the keys?
No problem at all! Get creative. You can use a bit of white or vanilla buttercream in a piping bag with a small round tip to pipe on little dots for the keys. Silver sanding sugar or even mini chocolate chips could also work in a pinch.
My buttercream is too runny/stiff. How do I fix it?
This is a super common and easy fix! If your buttercream is too runny, just add more sifted powdered sugar, a tablespoon at a time, until it thickens up. If it’s too stiff, add more heavy cream or milk, just a teaspoon at a time, until it reaches that perfect, spreadable consistency.
Can I make this a gluten-free bassoon cake?
Yes, you can! To make this gluten-free, substitute the all-purpose flour with a high-quality 1-to-1 gluten-free baking flour blend (one that already contains xanthan gum). Follow the recipe as written, but keep an eye on the baking time as it might vary by a few minutes.
A Sweet Finale!
And there you have it—a cake that’s as delightful to look at as it is to eat! Creating this cake is such a fun and rewarding project, and the look on your favorite musician’s face will be absolutely priceless. It’s more than just a dessert; it’s a celebration of their hard work and passion.
I truly hope you have a blast making this bassoon cake recipe. If you do, I would be so grateful if you could leave a comment and a rating below to let me know how it turned out. And please, please share your amazing creations with me on social media! I can’t wait to see your edible instruments. You can also check Beeshee Recipe.
Happy baking!
I am a passionate recipe developer and food enthusiast specializing in heart-warming traditional dishes and simple, everyday meals. My goal is to inspire you to find joy and confidence in the kitchen through my easy-to-follow recipes.