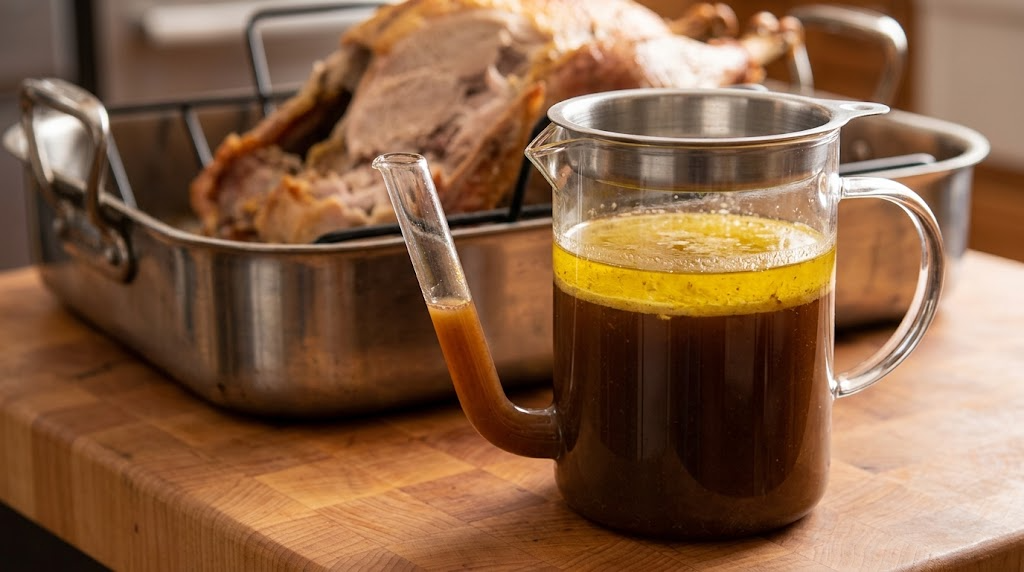
A gravy separator (also called a fat separator) looks like a strange measuring cup until you actually need to pull clean pan drippings away from a layer of fat, and then it becomes one of the more genuinely useful single-purpose tools in a holiday kitchen.
Some links in this post are affiliate links. If you buy through them we may earn a small commission at no extra cost to you — it never changes which products we recommend.
What Actually Matters
Bottom-Release vs Top-Pour Design
Bottom-release separators pour the liquid (the drippings you want) from a spout at the bottom while the fat stays trapped at the top — this is the design most cooks find more reliable, since you’re not trying to judge exactly when fat is about to spill over as you would with a top-pour spout.
Capacity for Your Typical Batch
A 2-cup separator is fine for a weeknight pan sauce, but a holiday turkey or roast can produce far more drippings than that. Sizing up to a 4-cup separator avoids having to separate in multiple batches during a busy cooking window.
Heat Resistance of the Material
Drippings straight off the stove or out of a roasting pan are hot enough to warp cheap plastic. A separator rated for higher heat resistance (or one with a heat-resistant strainer lid) holds up better over repeated holiday use.
From My Kitchen
Before I owned a real separator, I tried the old trick of chilling drippings and skimming the solidified fat off the top with a spoon, which works but takes twenty extra minutes you don’t have on a holiday cooking timeline. A bottom-release separator turned that into about thirty seconds, right at the moment the gravy actually needed to be finished.
Worth Considering
The OXO Good Grips 4 Cup Fat Separator has a reliable bottom-release spout and enough capacity for a full roast. For a smaller, simpler option that’s easy to store, the Fox Run Gravy/Fat Poultry Separator is a classic, no-frills choice.
How Fast Fat Actually Separates
Fat is less dense than the water-based liquid underneath it, so it rises on its own — and faster than most people expect. Pan drippings poured into a separator will show a clear fat layer within three to five minutes, and it is essentially complete within ten. That is the entire principle a separator relies on: give the liquid a few minutes of stillness, then draw from the bottom, below the layer you do not want.
The design detail that decides whether a separator works well is where the spout starts. A proper separator’s spout begins at the very base of the jug, so the first thing to leave is the defatted liquid and the fat stays behind until the very end. A jug where the spout starts partway up will always pour some fat first. The second detail is a built-in strainer at the top, which catches the browned bits and herb debris that would otherwise make your gravy gritty.
Quick Comparison
| Spout-from-base jug | Bottom-valve separator | Ladle-style skimmer | |
|---|---|---|---|
| How you separate | Pour from a base-level spout | Release liquid through a valve | Skim fat off the surface |
| Precision | Good, needs watching at the end | Best — stop at the fat line | Depends entirely on your hand |
| Cleaning | Easy, few parts | Valve needs disassembly | Trivial |
| Capacity | Usually 2–4 cups | Often 4 cups and up | Any bowl |
| Best for | Weekly roasts | Large birds and big batches | Occasional use, no storage cost |
Capacity Is Where People Get It Wrong
A 4-cup separator is right for a chicken and comfortably handles most weeknight roasting. A turkey is a different situation entirely — a large bird can throw off well over four cups of drippings, which means working in batches while the gravy waits and the roast rests. If your separator only comes out at holidays for a big bird, size up. If it is a weekly tool for chicken and pork, 4 cups is the practical size and easier to store.
Heat tolerance is worth checking too, since drippings come out of the oven far hotter than most plastic jugs are rated for. Letting them sit in the roasting tin for two or three minutes before pouring costs nothing and keeps you well inside the safe range for any separator. Glass models avoid the question but are heavier and less forgiving if you knock them against the tin.
Two Separators Worth Considering
Best overall: OXO Good Grips 4-Cup Fat Separator
Base-level spout, an integrated strainer that catches the fond debris, and clear volume markings so you know how much liquid you are actually working with for the gravy ratio. Four cups suits the roasts most households actually cook.
Pros
- Spout draws from the very bottom
- Built-in strainer catches browned bits
- Clear markings help with gravy ratios
Cons
- Four cups is tight for a large turkey
- Let very hot drippings cool briefly before pouring
Best simple option: Fox Run Gravy and Fat Poultry Separator
A straightforward, no-mechanism separator — which means nothing to disassemble, nothing to clog and nothing to break. If you want the job done once or twice a month without owning a gadget with parts, this is the honest version of the tool.
Pros
- Very few parts, quick to clean
- Inexpensive for an occasional-use tool
- Does the core job properly
Cons
- No valve, so the last pour needs attention
- Fewer convenience features than premium models
Frequently Asked Questions
Can I skip a fat separator and just skim with a spoon?
You can, but it’s slower and less precise, especially with drippings that have a thin fat layer that’s hard to catch cleanly with a spoon — a separator does this in seconds by design.
Does a fat separator work with cold drippings too?
Yes, though it works fastest and most cleanly with warm drippings, since fat separates and rises more readily before it starts to solidify.
Can I just skim the fat with a spoon instead?
You can, and for small amounts it is fine. Two low-tech methods work better than spoon-skimming though. Drop a few ice cubes into the drippings — fat congeals around them within a minute and lifts out in a sheet. Or pour everything into a zip-top bag, let it settle, then snip a small corner and let the defatted liquid run out, pinching it closed as the fat line reaches the bottom. Both work; the bag trick is messier but genuinely precise.
How hot can drippings be when they go into a plastic separator?
Most plastic separators are rated somewhere around 200°F, and drippings straight from a hot roasting tin can exceed that. Giving them two or three minutes in the tin while the roast starts resting brings them comfortably into range. If you regularly work with very hot liquid or want to remove the question, a borosilicate glass separator handles it without concern — at the cost of weight and breakability.

Rimi Sultana is a home cook from Bangladesh who has cooked for her family every day for the past five years and writes about it at Smart Cooks. Perpetually testing whether internet-famous recipes actually work in a regular home kitchen. Say hello on Facebook or through the contact page.